Simon Online

2021-08-31

SQL Mail

Did you know you can hook up your SQL server (or Managed SQL on Azure) to an SMTP server and use it to send email. Terrible idea? Yes, probably. I really encourage people not to build business logic that might require creating an email into stored procs. Required for legacy code? Yes, certainly.

You first need to tell SQL server how to talk to the mail server. This is done using the sysmail_add_Account_sp

EXECUTE msdb.dbo.sysmail_add_account_sp
    @account_name = 'Database Mail Account',
    @description = 'SQL Server Notification Service',
    @email_address = 'SQLServer@somedomain.com',
    @replyto_address = 'SQLServer@somedomain.com',
    @display_name = 'Database Mail Profile',
    @mailserver_name = 'smtp.office365.com',
    @port = 587,
    @username = 'SQLServer@somedomain.com',
    @password = 'totallynotourpassword',
    @enable_ssl = 1;

With that in place you can set up a mail profile to use it

SELECT @sequence_number = COALESCE(MAX(profile_id),1) FROM msdb.dbo.sysmail_profile;

-- Create a mail profile
EXECUTE msdb.dbo.sysmail_add_profile_sp
    @profile_name = 'Database Mail Profile',
    @description = 'Sends email from the db';

-- Add the account to the profile
EXECUTE msdb.dbo.sysmail_add_profileaccount_sp
    @profile_name = 'Database Mail Profile',
    @account_name = 'Database Mail Account',
    @sequence_number = @sequence_number;

-- Grant access to the profile to the DBMailUsers role
EXECUTE msdb.dbo.sysmail_add_principalprofile_sp
    @profile_name = 'Database Mail Profile',
    @principal_id = 0,
    @is_default = 1 ;

You can then make use of sp_send_dbmail to send email

EXEC msdb.dbo.[sp_send_dbmail]
    @profile_name = 'Database Mail Profile',
    @recipients = 'simon.timms@somedomain.com',
    @subject = 'Testing db email',
    @body = 'Hello friend, I''m testing the database mail'

You can check the status of the sent email by querying

select * from msdb.dbo.sysmail_allitems

If things fail then checking the event log may be helpful

select * from msdb.dbo.sysmail_event_log 
2021-08-31

Reauthenticate with Nuget

If you have a private nuget feed authenticated with a password chances are your password will eventually expire or change. For some reason Visual Studio and perhaps nuget under the covers aggressively caches that password and doesn’t prompt you when the password doesn’t work anymore. To change the password the easiest approach I’ve found is to use the nuget.exe command line tool and run

c:\temp\nuget.exe sources update -Name "Teamcity" -Source "https://private.nuget.feed.com/httpAuth/app/nuget/feed/_Root/SomeThing/v2" -UserName "simon.timms" -Password "Thisisactuallymypassword,no,really"
C:\temp\nuget.exe list -Source teamcity
2021-08-13

Which Key to use for Managed Identity in Keyvault

I have a terraform deployment which runs in azure pipeline. Azure pipelines is connected to Azure via a service connection. This service connection is registered as an application in the Azure AD of the Azure account. The problem I constantly run into is that I can’t remember which id from the application should be granted keyvault access so the build pipeline can read and write to keyvault.

resource "azurerm_key_vault_access_policy" "terraformaccess" {
  key_vault_id = azurerm_key_vault.keyvault.id

  tenant_id = local.tenant_id
  object_id = ???????????????????

  key_permissions = [
    "Get",
    "Create",
    "List",
    "Update",
    "Verify",
    "Delete",
    "WrapKey",
    "UnwrapKey"
  ]

  secret_permissions = [
    "Get",
    "List",
    "Set"
  ]

  storage_permissions = [
    "Get",
    "List",
    "Set",
    "Update"
  ]
}

Maybe the value is in the portal somewhere:

Nope.

It seems to be findable by doing either

Login-AzureRmAccount -SubscriptionId <your subscription id>;
$spn=(Get-AzureRmADServicePrincipal -SPN <the application id>);
echo $spn.Id

or

 az ad sp list --spn <the application id>

Then look for ObjectId

2021-07-30

Stop Terraform Managing State for a Resource

Say you want to keep a resource but you want to stop terraform from managing it. You can ask terraform to update its state to forget about it. In my case I want terraform to forget it managing my Azure Static Web App because Terraform doesn’t support all the options I need and will clobber the app.

I can run this

terraform state rm "azurerm_static_site.agentportal"

If I decide to start managing the state again I can just run a terraform import to manage it again.

2021-07-29

Storybook IFrame 404

If you’re running into a 404 on the IFrame on storybook the mostly likely cause is that your directory path to where storybook is contains some encoded characters. In this case we had a project called Agent%20Portal on disk. Renaming it to just AgentPortal fixed up storybook right away.

2021-07-26

Building an SQL Azure Connection String using terraform

If you provision a database using terraform you often find that you need to get that connection string into app settings or key vault or something like that. To do that you first need to build it because the outputs from the database resource don’t include it.

From the database you want to export

output "database_name" {
  value = azurerm_sql_database.database.name
}

Then when you actually build the string you want something like this:

database_connection_string    = "Server=tcp:${module.database.name}.database.windows.net,1433;Initial Catalog=${module.database.database_name};Persist Security Info=False;User ID=${var.database_user};Password=${var.database_password};MultipleActiveResultSets=True;Encrypt=True;TrustServerCertificate=False;Connection Timeout=30;"

Then you can push this to KeyVault or an App Service directly.

2021-07-26

Deploying App Settings to an Azure Static Web App

Static web apps are pretty cool but certain parts of them feel like they are still a little raw. It is a newish product so I can understand that. I just wish the things that didn’t get attention were something other that devops things. That’s mostly because I’m so big on builds and repeatable processes. Being able to set app setting is one of the things I think falls through the cracks.

The docs for statics web apps suggests two different ways of setting app settings. First through the portal which we can ignore right out the gate because it is manual. The second is through an az command that actually just exercises a REST endpoint. No Arm support, no terraform support, no bicep support, no azure powershell support… a long way to go.

The az command takes in a specially formatted json file. My databse and connection string variables are set up as outputs from my terraform. Once I have them imported into my Azure DevOps build pipeline I use powershell to build the template file like so:

$temp = gc api/api/local.settings.template.json | ConvertFrom-Json
$temp.properties.STORAGE_CONNECTION_STRING = "$(terraformOutput.storage_connection_string)"
$temp.properties.DATABASE_CONNECTION_STRING = "$(terraformOutput.database_connection_string)"
$temp | ConvertTo-json > api/api/local.settings.template.json

Now this needs to be passed up to azure using the AzureCLI task

  - task: AzureCLI@2
    inputs:
    azureSubscription: 'Azure Sub'
    scriptType: 'pscore'
    scriptLocation: 'inlineScript'
    inlineScript: |
        gc api/api/local.settings.template.json
        az rest --method put --headers "Content-Type=application/json" --uri "/subscriptions/6da8d6e6-41f1-xxxx-xxxx-xxxxxxxx/resourceGroups/dev-portal/providers/Microsoft.Web/staticSites/dev-portal/config/functionappsettings?api-version=2019-12-01-preview" --body @api/api/local.settings.template.json
2021-07-24

Vetur Warnings in Azure Static Web App

I have a static web app that has directories for the front end written in Vue and the back end written in Azure functions. When I open it in VS Code I get warnings that Vetur can’t find the package.json or tsconfig.json. This is because the Vue project isn’t at the project root. This can be fixed by adding, at the root, a vetur.config.js containing a pointer to the web project. With my web project being in web (creative I know) the file looks like

// vetur.config.js
/** @type {import('vls').VeturConfig} */
module.exports = {
    // **optional** default: `{}`
    // override vscode settings
    // Notice: It only affects the settings used by Vetur.
    settings: {
      "vetur.useWorkspaceDependencies": true,
      "vetur.experimental.templateInterpolationService": true
    },
    // **optional** default: `[{ root: './' }]`
    // support monorepos
    projects: [
      './web'
    ]
  }
2021-07-08

Enable TeamCity Symbol Server

First off a symbol server is a server which stores the symbols from a built binary so you don’t have to ship out PDB files with your compiled code to be able to debug it. You can hook up visual studio to search a symbol server when you’re debugging so that you can drop into code for something like a shared nuget package. Teamcity, as it turns out, has a plugin to support being a symbol server. Here is how you get started with it:

  1. Install the symbol server plugin by going to Administration > plugins > Browse plugins repository and search for symbol
  2. On your build agents install the windows debugging tools which are shipped as part of the Windows SDK. For windows 10 you can grab it here: https://developer.microsoft.com/en-us/windows/downloads/windows-10-sdk/ During the install you’ll be prompted for which components you want to install and you can just turn off everything but the debugging tools.
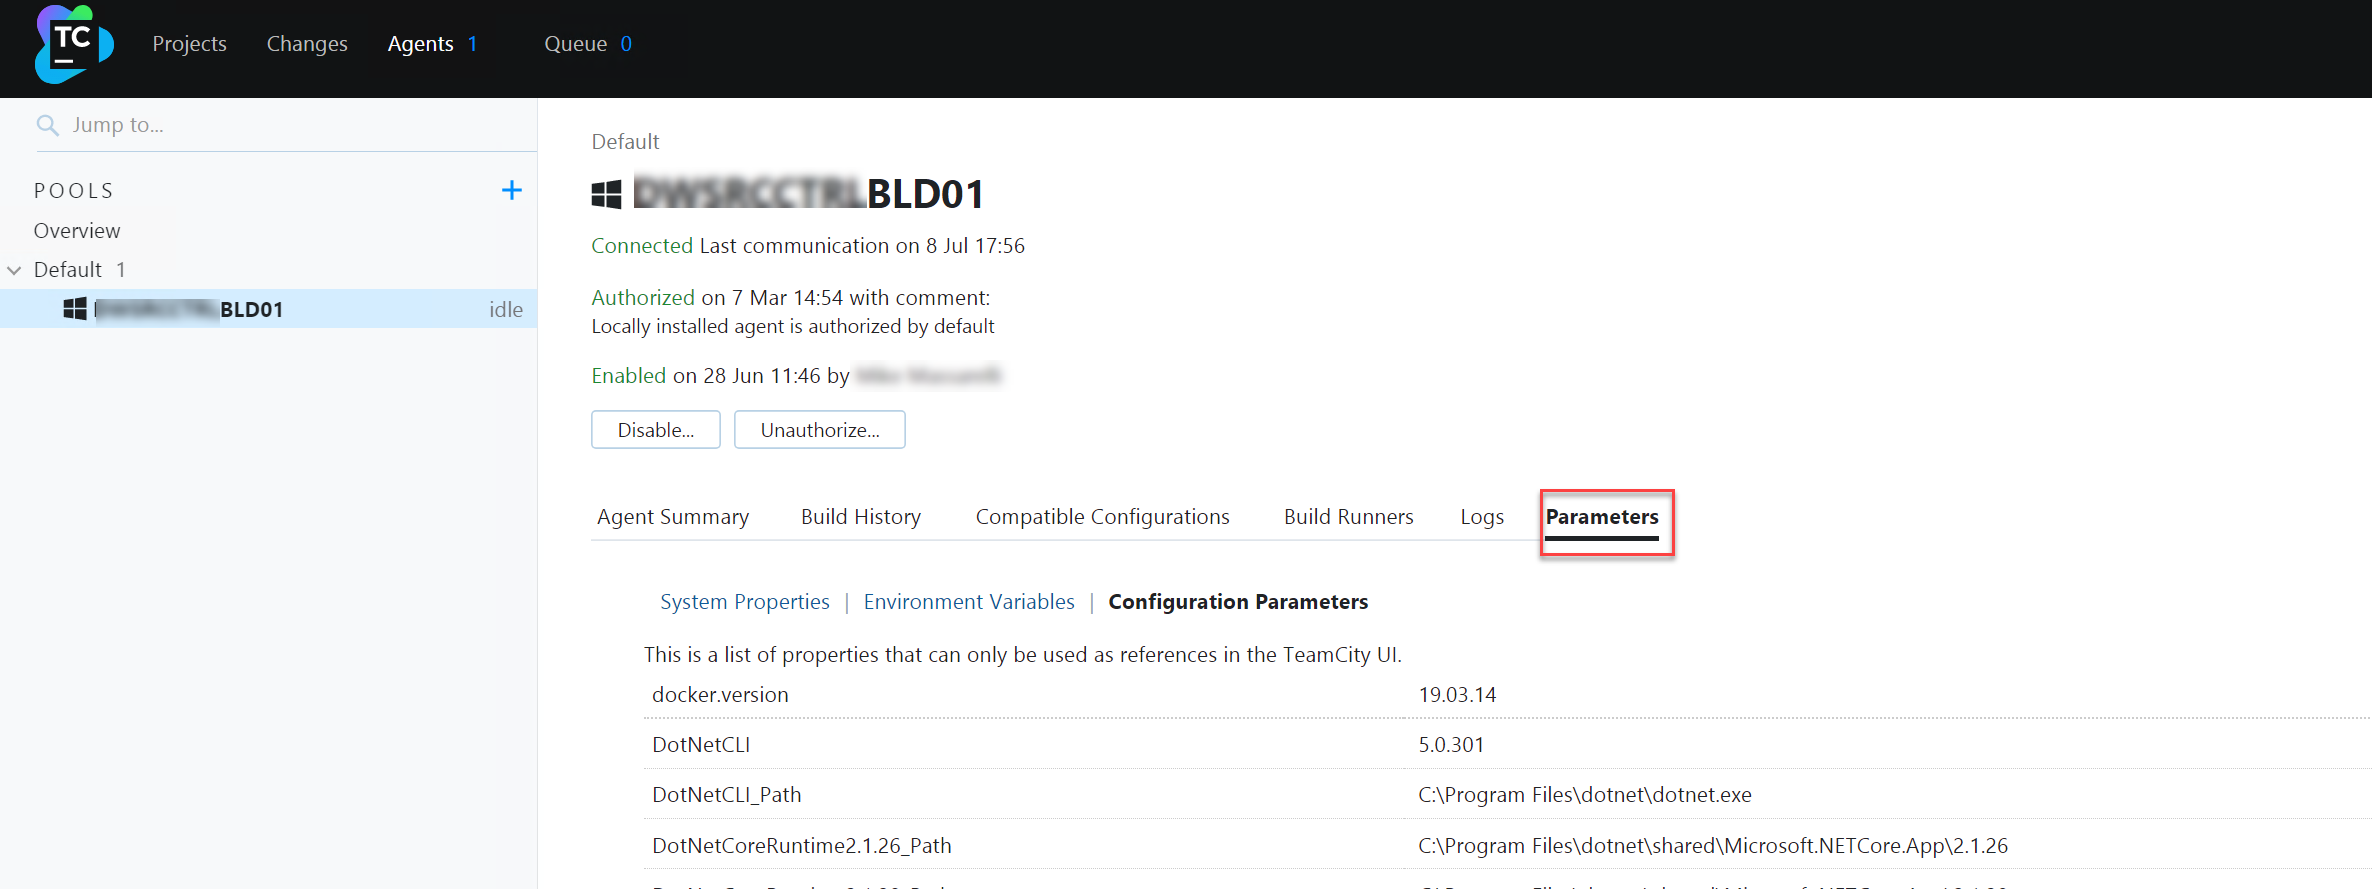
  3. Remember to restart your build agents so they can register the debugging tools as being installed. You can check by going to the build agent in teamcity. Click on parameters

    In there, at the bottom, you should find an entry for the debugger
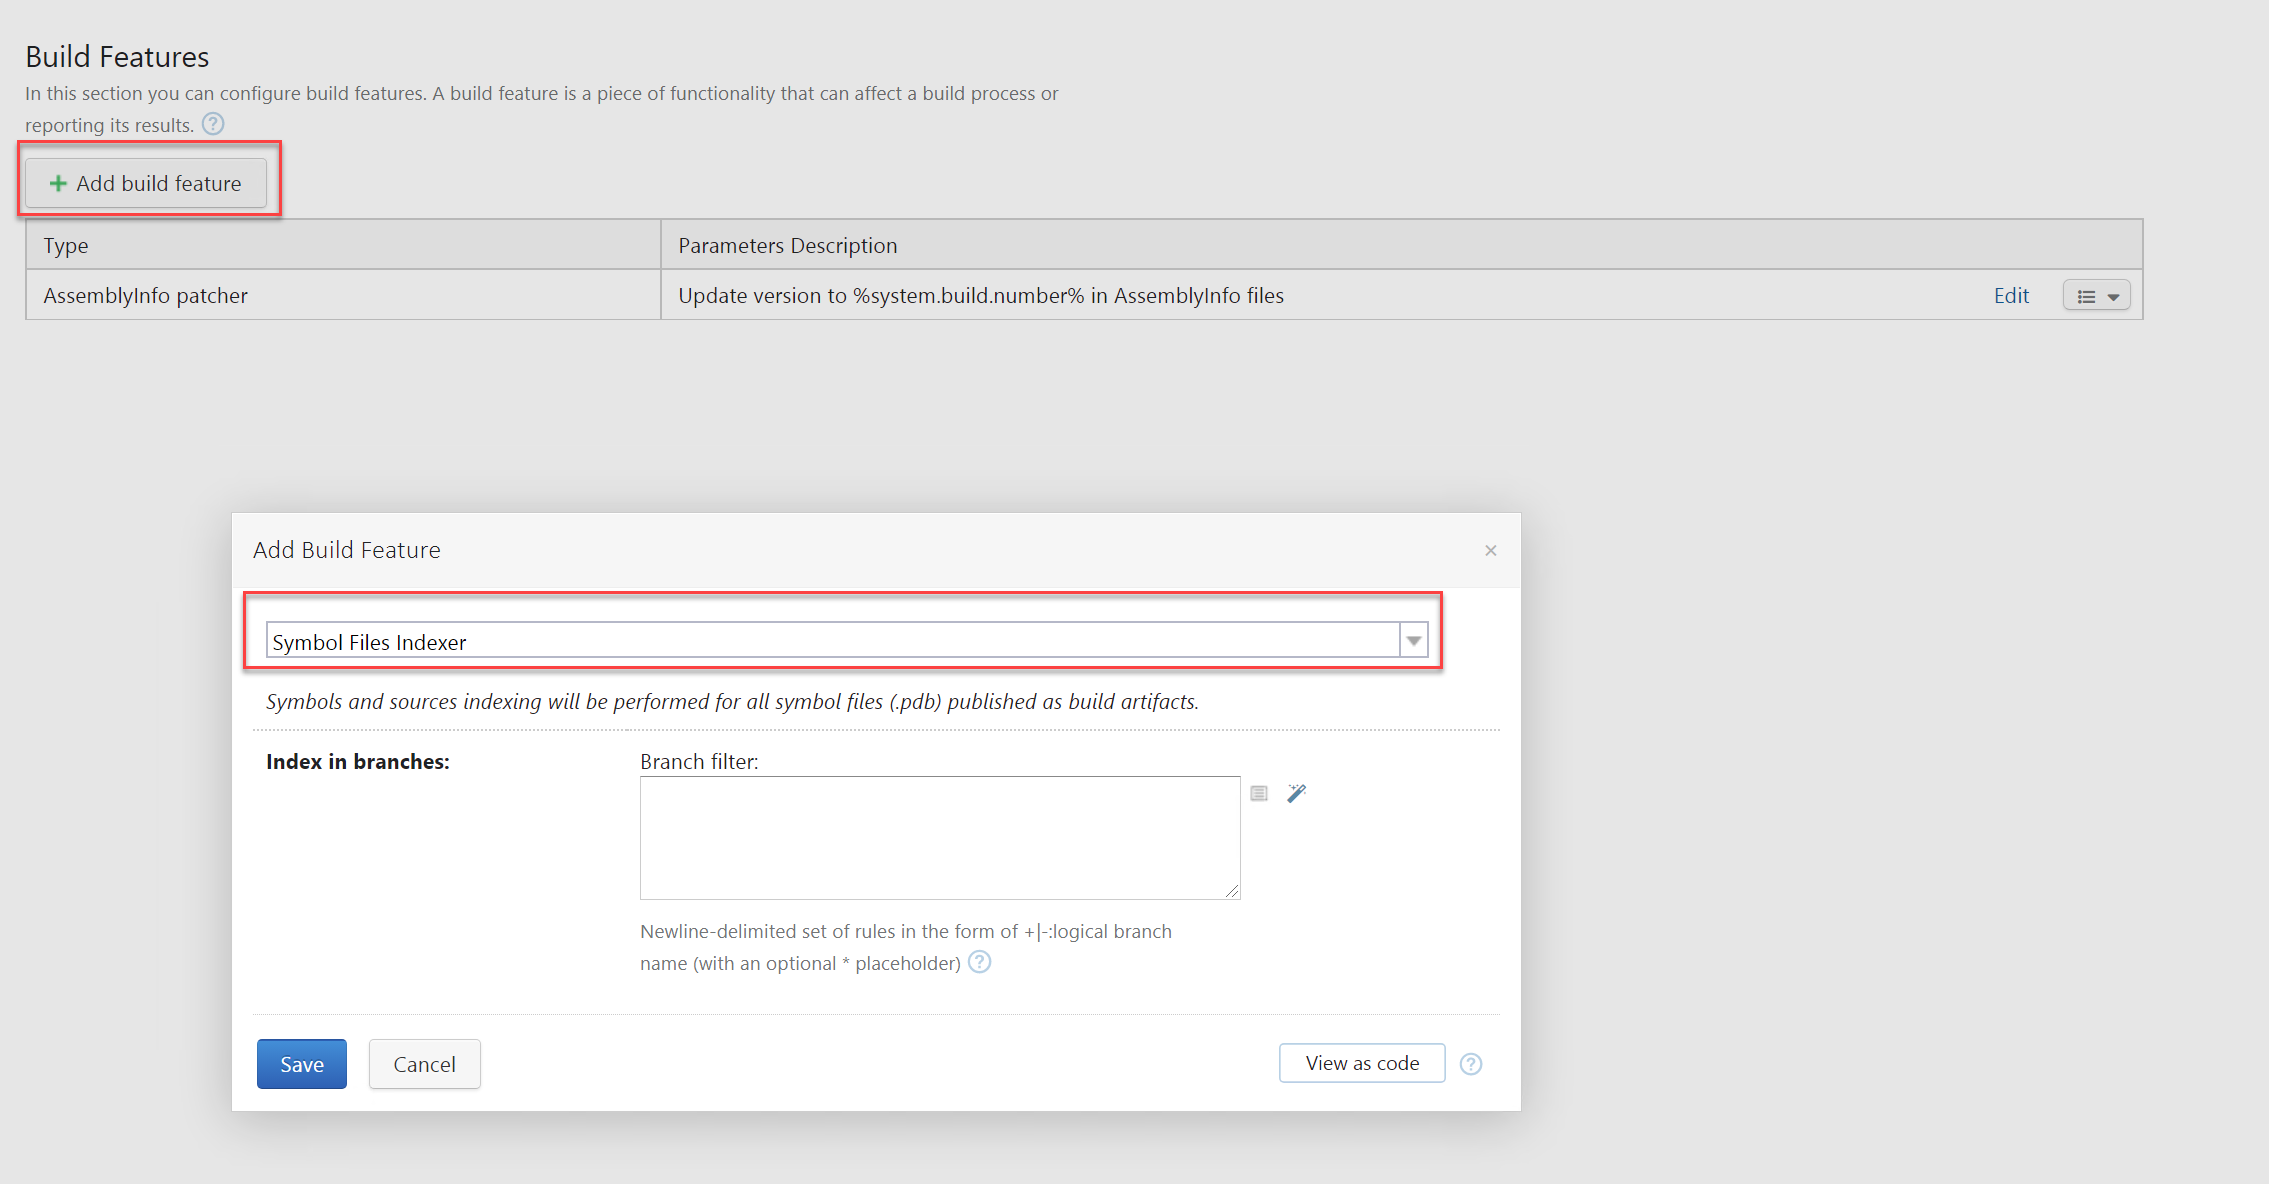
  4. In the projects you want symbols for enable the symbol server feature
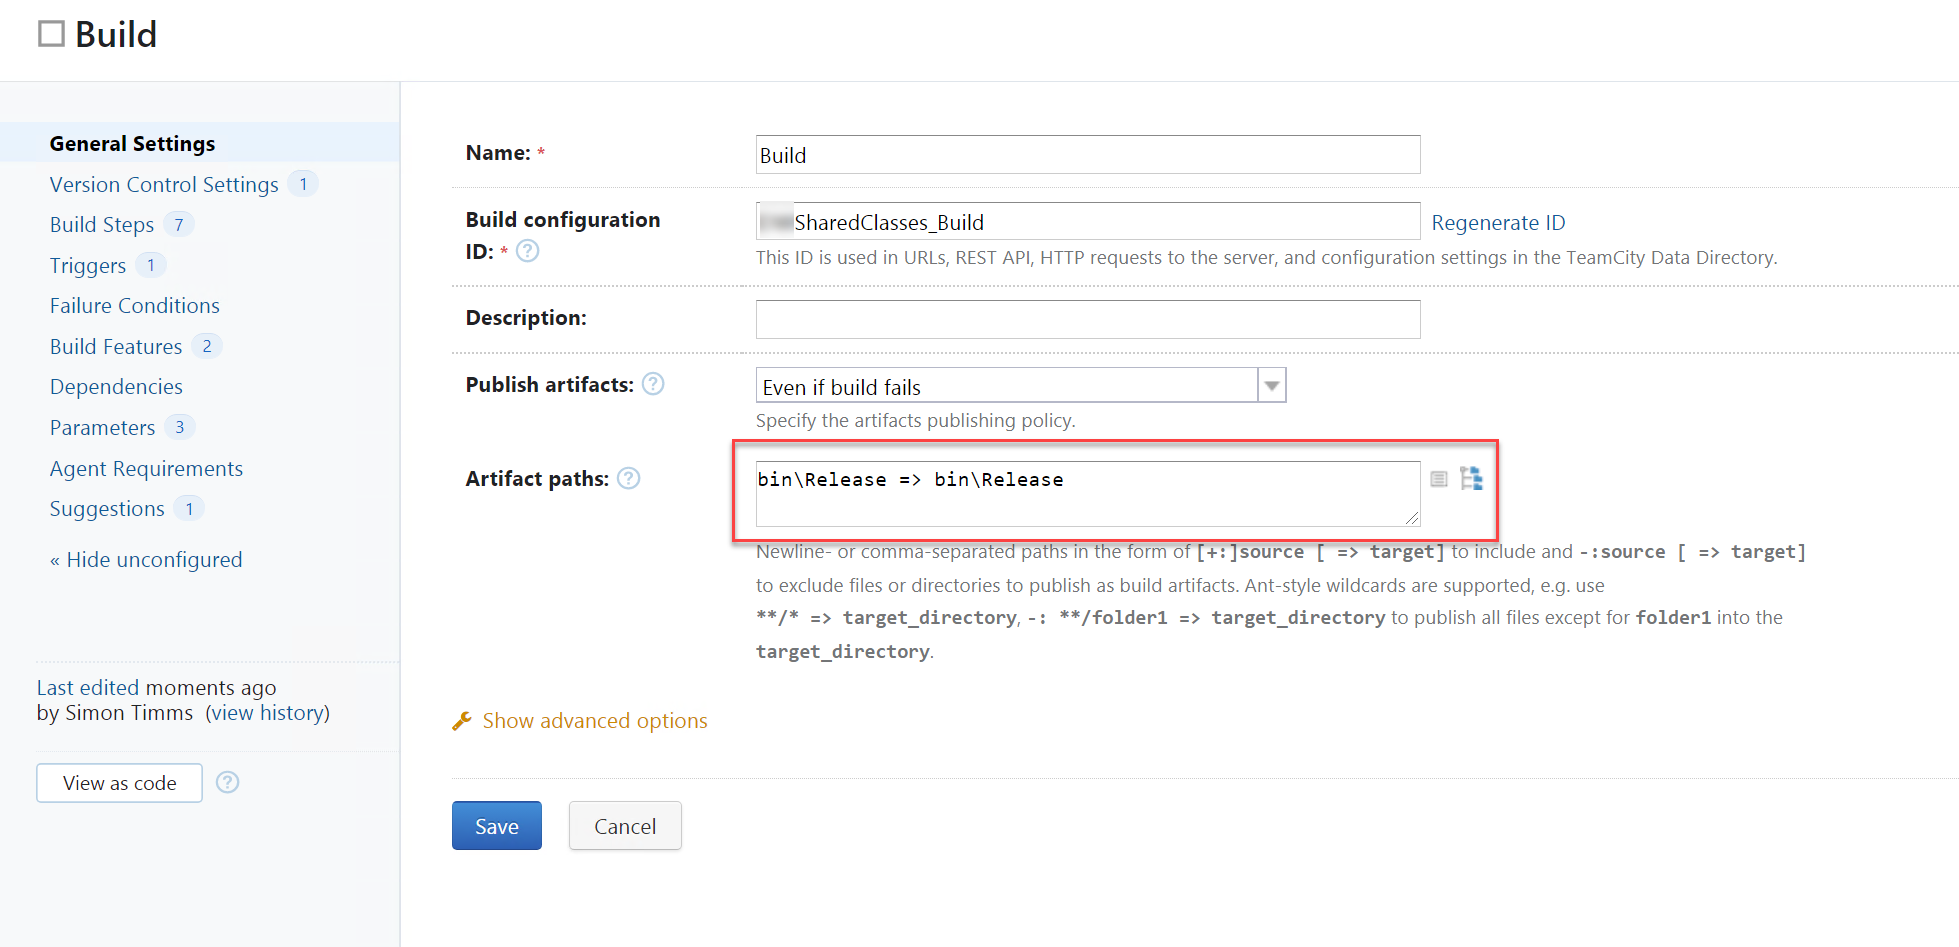
  5. In the build artifacts you need to ensure that both the PDB and the associated EXE or DLL are selected as artifacts.

That’s pretty much it. In your build now you should see a few log messages to let you know that the symbol server indexing is working

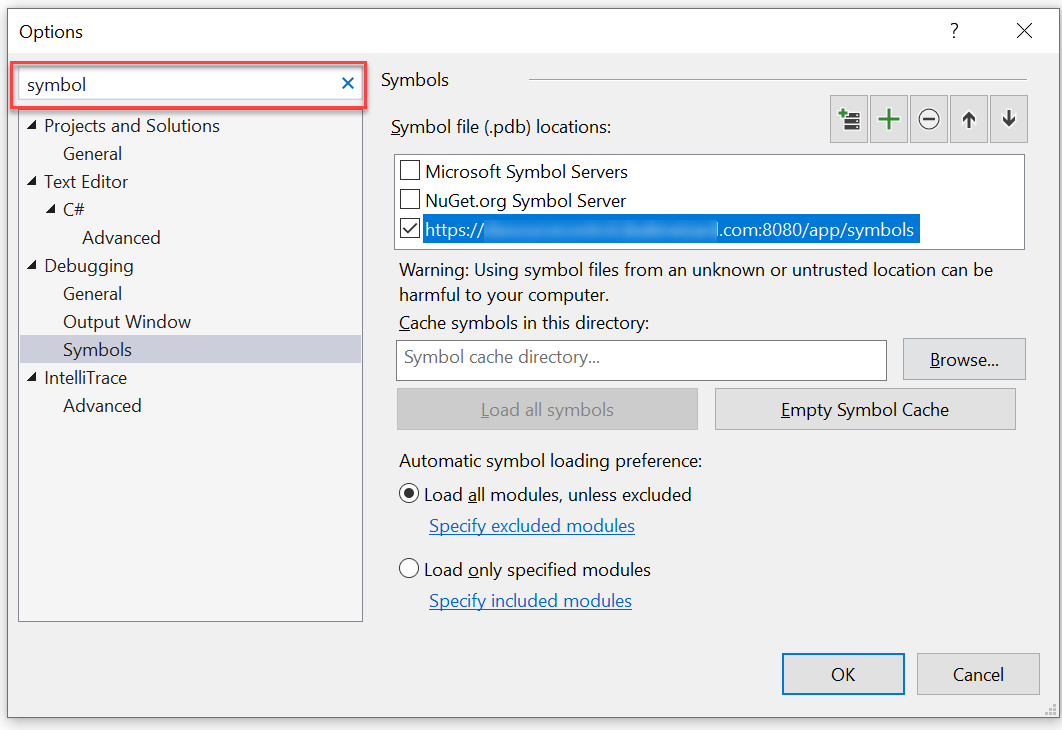
Now you can hook up Visual Studio to use this by going into settings and searching for symbols then paste the URL of the teamcity server with /app/symbols at the end of it into the box

Now when you’re debugging in visual studio you’ll have access to the symbols.

2021-07-06

Enable SSO for Snowflake using Azure AD

So you want to enable single sign on for you AD users to Snowflake? There are a bunch of good reasons to do this: it makes managing users easier, deleting a user in AD deletes them in snowflake so you don’t have a laundry list of places to delete a user when users leave.

The process is a 2 sided thing: setting up the Snowflake integration on the AD side and then letting Snowflake know where to authenticate its users.

Azure Side

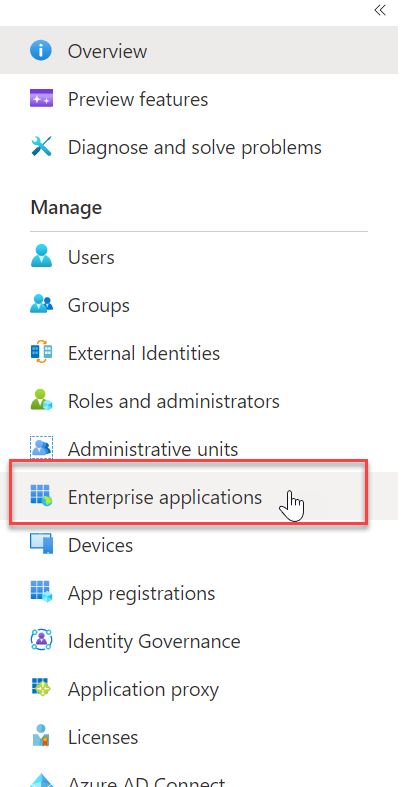
  1. Go to azure AD and click on Enterprise Applications on the left hand side
  2. Click New Application and search for Snowflake select it and create it
  3. In there set up the links to your Snowflake tenant for single sign on by selecting Single sign-on on the left
  4. Fill in the URLs for your snowflake instance. The only thing that you really need to pay attention to is that you’re using the snowflake name on your already created snowflake instance.
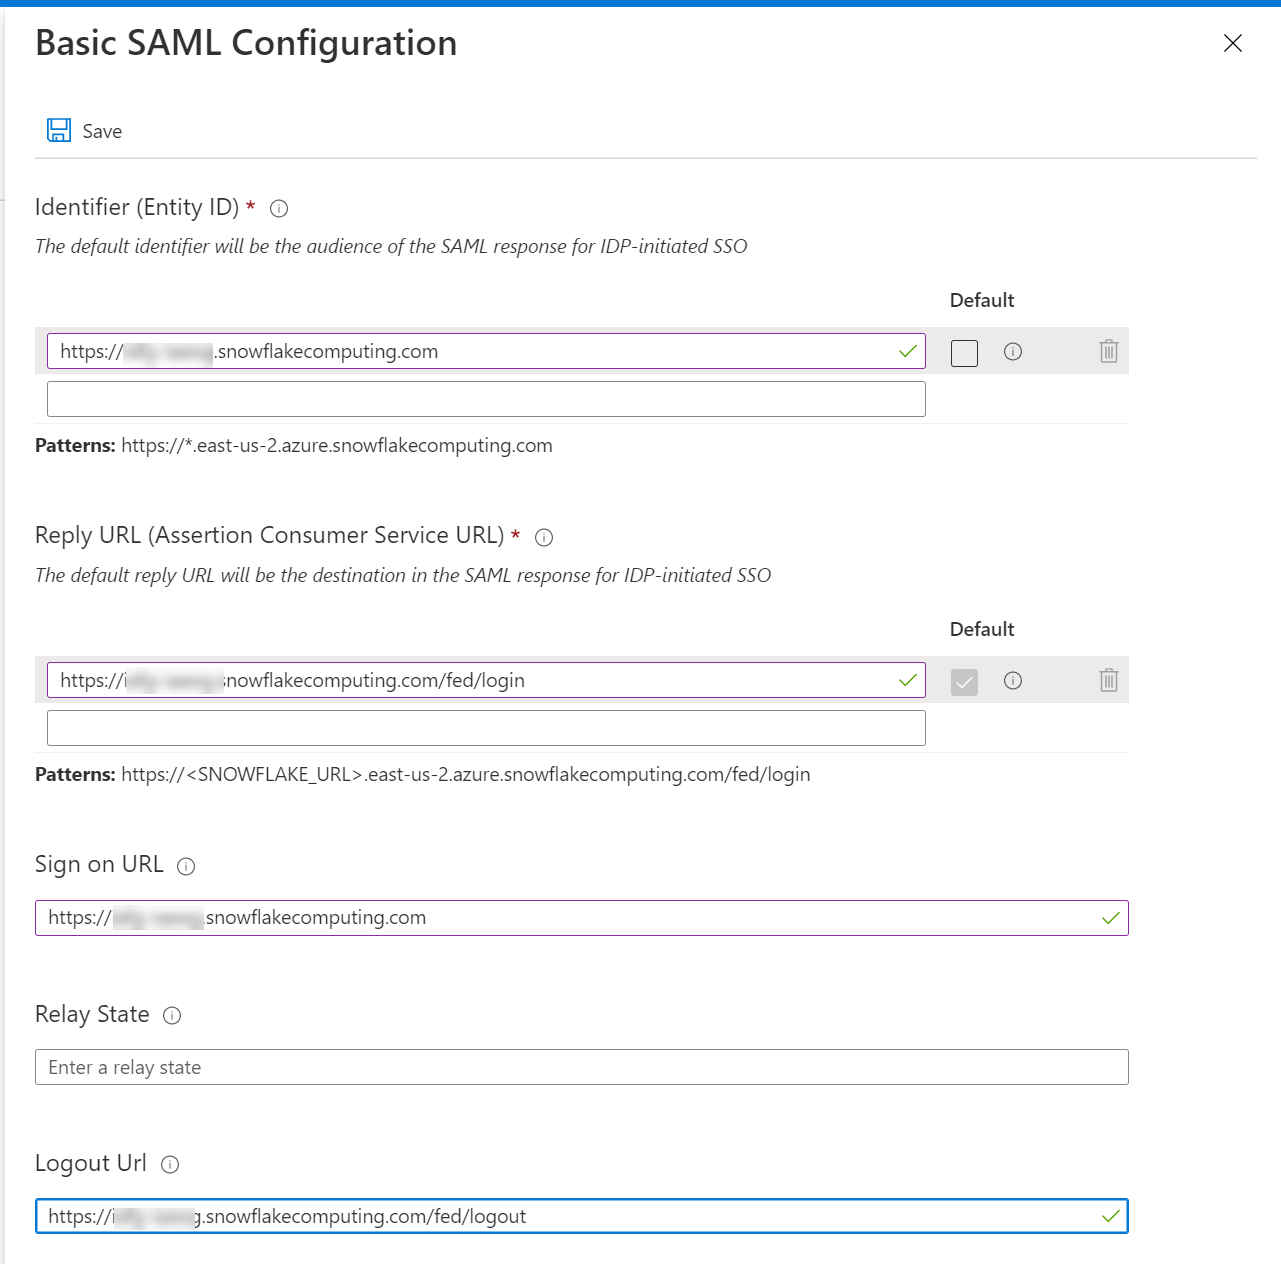
  5. Download the Base64 Certificate from the SAML Signing Certificate section
  6. Assign a test user to the snowflake integration by clicking on users and groups and adding an existing user

Snowflake Side

  1. Run this query in snowflake. It adds a saml identity provider and then set up single sign on
use role accountadmin;
alter account set saml_identity_provider = '{
"certificate": "<Paste the content of downloaded certificate from Azure portal>",
"ssoUrl":"<Login URL value which you have copied from the Azure portal, something like https://login.microsoftonline.com/44xxxx25-xxxx-415b-bedc-xxxxxxxxxxxxxx/saml2>",
"type":"custom",
"label":"AzureAD"
}';
alter account set sso_login_page = TRUE;
  1. Hook up the user you created earlier in AD
    CREATE USER simon_timms PASSWORD = '' LOGIN_NAME = 'user@somedomain.com' DISPLAY_NAME = 'Simon Timms';
    

You should now be able to log in with your AD account. Open up an incognito tab and go to your snowflake instance. In there click on the SSO option and enter your AD credentials.

Automatic Provisioning

Obviously it sucks to provision the users manually in snowflake so you can have AD sync changes over to it. To do this start with snowflake. You’ll need to create a user who can provision users.

create or replace role aad_provisioner;
grant create user on account to role aad_provisioner;
grant create role on account to role aad_provisioner;
grant role aad_provisioner to role accountadmin;
create or replace security integration aad_provisioning
    type = scim
    scim_client = 'azure'
    run_as_role = 'AAD_PROVISIONER';
select system$generate_scim_access_token('AAD_PROVISIONING');

This should give you a long key which you should copy.
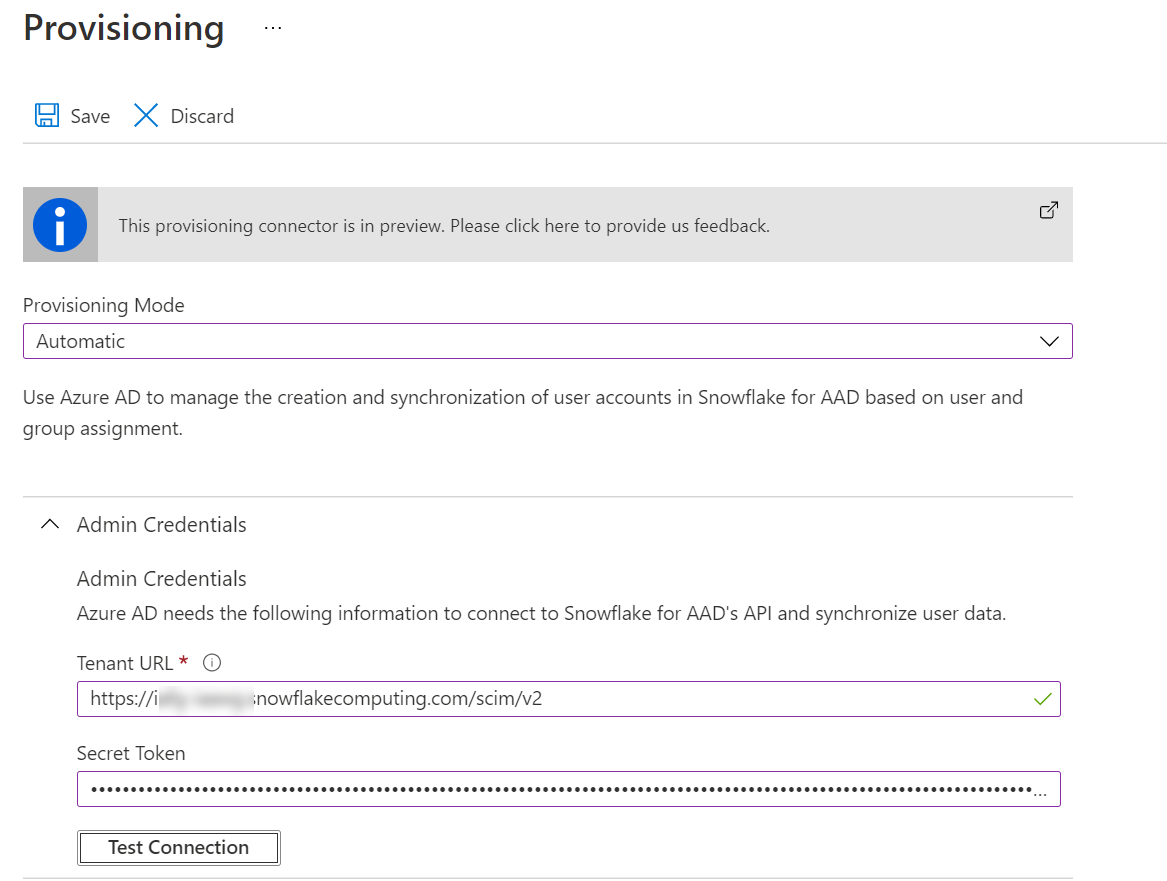
Go back to the AD app and click on Provisioning. In there change over to automatic provisioning. Enter the key in the Secret Token field and in the Tenant Url field enter your usual URL but this time with /scim/v2 on the end of it.

Test the connection and ensure that it can connect properly. With that done you’ll need to turn provisioning status on
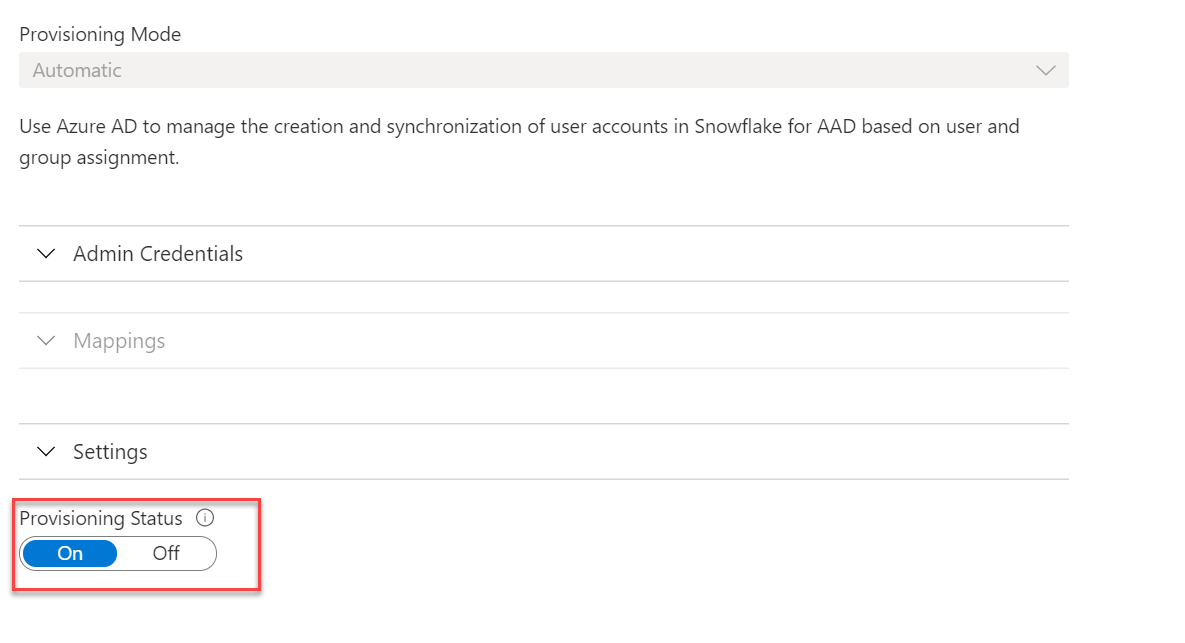
Adding Users to the Sync

If you want to add a new user to the synchronizing then go back to the snowflake app under Enterprise Applications in Azure AD. In there click on Users and groups
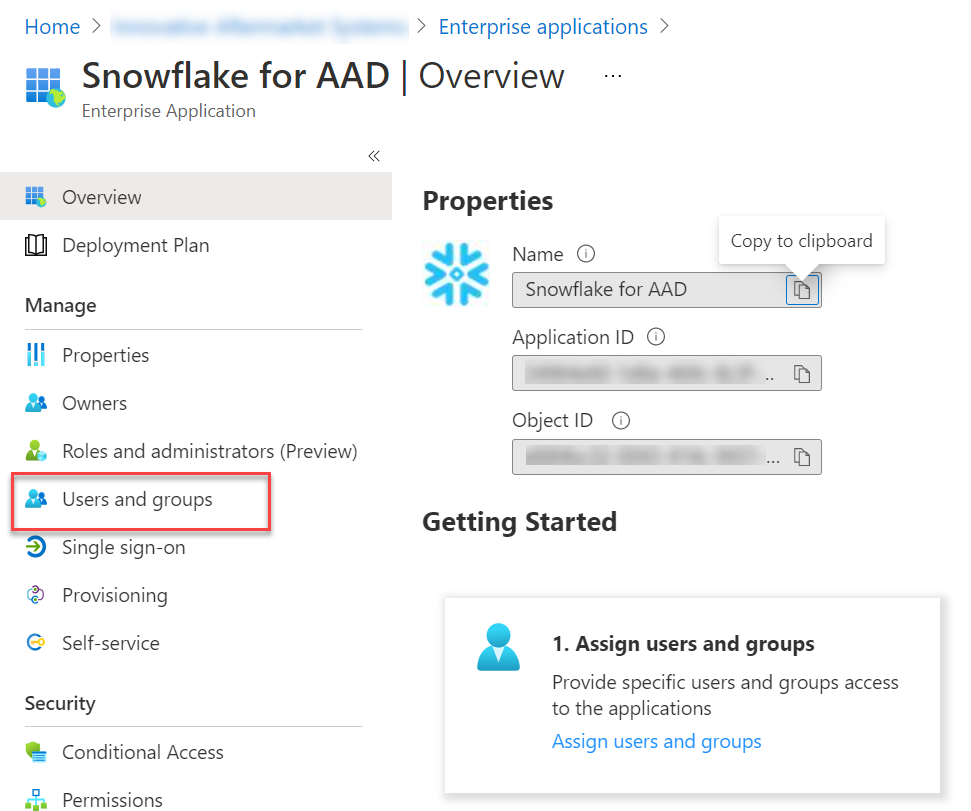
Then on the add users and groups button. In there you can select your user and click Assign. That should be it. It may take a few minutes to sync. You can always check the status of the sync by going to the Provisioning item

Gotchas!

The biggest one here is that the snowflake key used in automatic provisioning only has a lifespan of 6 months. It is almost certainly going to break horribly at that time. You should mitigate this by having the sync job email you if it fails. This can be done in the settings page in Azure

To get a new token you’ll need to log into snowflake and run the following query

select system$generate_scim_access_token('AAD_PROVISIONING');

This will generate a new token and you’ll need to copy it back into Azure. A gotcha inside a gotcha here is that running this command can only be done as ACCOUNTADMIN so you need to select that here: