Simon Online

2014-03-03

ASP.net Identity Default Cookie Expiry

I couldn’t find how long the cookie expiry for a cookie based identity token is for ASP.net Identity anywhere in any documentation. I ended up decompiling Microsoft.Owin.Security.Cookies in which that property is defined. The default expiry is 14 days with a sliding expiration window.

The full set of defaults looks like:

UPDATE: Pranav Rastogiwas kind enough to point out that the source code for this module is part of the Katana Project and is available on codeplex

2014-03-03

Automating Azure Deployments

I’m a pretty big fan of what Microsoft have been doing as of late with Azure. No matter what language you develop in there is something in Azure for you. They have done a good job of providing well sized application building blocks. I spent about a week digging into Amazon Web Services and Azure to help out with an application deployment at work. Overall they are both amazing offerings. When I’m explaining the differences to people I talk about how Amazon started with infrastructure as a service and are now building platform as a service. Azure started at the opposite end: platform as a service, and are working towards infrastructure as a service.

Whether one approach was better than the other is still kind of up in the air. However one area where I felt like Amazon was ahead of the game was in provisioning servers. This isn’t really a result of Amazon stepping up so much as it is a function of tools like Chef and Puppet adopting Amazon over Azure. Certainly Cloud Formation, Amazon’s initial offering in this space, is good but Chef/Puppet are still way better. I was a bit annoyed that there didn’t’ seem to be any answer to this from Microsoft. It wouldn’t be too difficult for them to drop 10 engineers into the Chef and Puppet teams to allow them to deploy on Azure. Then I remembered that they were taking the platform before infrastructure approach. I was approaching the situation incorrectly. I shouldn’t be attempting to interact with Azure at this level for the services I was deploying to websites and SQL Azure.

One thing about the Azure portal which is not super well publicized is that it interacts with Azure proper by using RESTful web services. In a brilliant move Microsoft opened these services up to anybody. They are pretty easy to use directly from Curl or something similar but you need to sign your requests. Fortunately I had just heard of a project to wrap all the RESTful service calls in nice friendly managed code.

In a series of articles I’m going to show you how to make use of this API to do some pretty awesome things with Azure.

Certificates

The first step is to create a new management certificate and upload it to Azure. I’ll assume you’re on Windows but this can all be done using pure OpenSSL on any platform as well.

  1. Open up the Visual Studio Command prompt. If you’re on Windows 8 you might have to drop to the directory directly as there is no hierarchical start menu anymore.C:Program Files (x86)Microsoft Visual Studio 12.0Common7ToolsShortcuts.

  2. In the command prompt generate a certificate using

makecert -sk azure -r -n “CN=azure” -pe -a sha1 -len 4096 -ss azureManagement

This will create a certificate and put it into the certificate manager on windows. I’ve used a 4096 bit key length here and sha1. It should be pretty secure.

  1. Open the certificate manager by typing

certmgr.msc

into the same command prompt.

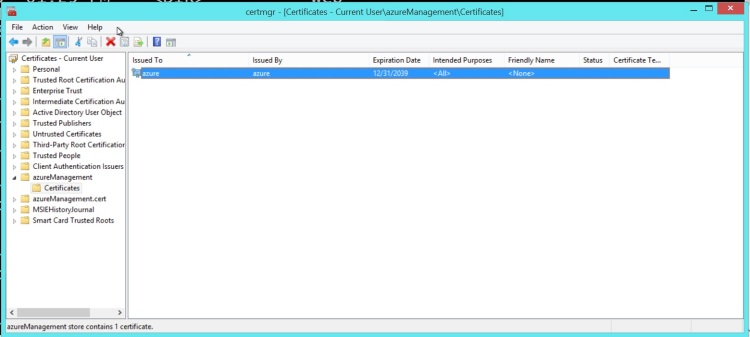
  1. In the newly opened certificate manager you’ll find a folder named azureManagement. Open up that folder and the Certificates folder under it to find your key.

Screen Shot 2014-03-02 at 8.30.08 AM5. Right click on that key and select Tasks > Export

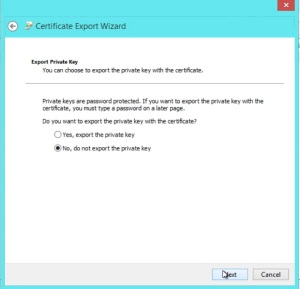
  1. Select “No, export a public key”

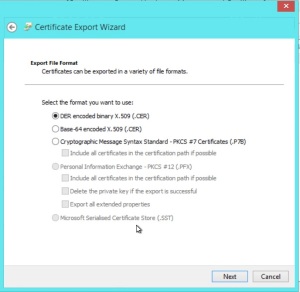
Screen Shot 2014-03-02 at 8.33.52 AM7. In the next step select the Der encoded key

Screen Shot 2014-03-02 at 8.33.22 AM

  1. Enter a file name into which to save the certificate.

You have now successfully created an Azure management key. The next step is to upload it into Azure.

  1. In the management portal click on on settings

  2. In the settings section select the Management Certificates tab.

  3. Click upload and select the newly created .cer file.

You now have the Azure half of the certificate complete. The next step is to get the client side of the certificate, a .pfx file, out. This is done in much the same way as the the private key, except this time select “Yes, export the private key”.

  1. Right click on the certificate, select tasks then export

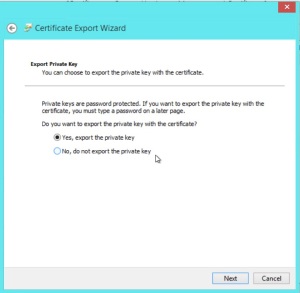
  2. Select “Yes, export the private key”

Screen Shot 2014-03-02 at 1.43.49 PM

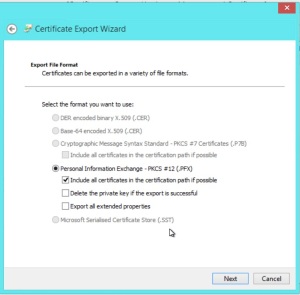
  1. The default options on the next screen are fine

Screen Shot 2014-03-02 at 1.45.25 PM4. Finally enter a password for the pfx file. The combination of password and certificate are what will grant you access to the site.

Creating a Database

There is a ton of stuff which you can do now that you’ve got your Azure key set up and I’ll cover more of it in coming posts. It didn’t seem right to just teach you how to create a key without showing you a little about how to use it.

We’ll just write a quick script to create a database. Start with a new console application. In the package manager run

Install-Package Microsoft.WindowsAzure.Management.Libraries -Pre

At the time of writing you also need to run

Install-Package Microsoft.WindowsAzure.Common -Pre

This is due to a slight bug in the nuget packages for the management libraries. I imagine it will be fixed by the next release. The libraries aren’t at 1.0 yet which is why you need the -Pre flag.

The code for creating a new server is simple.

First step in the GetCredentialson line 21 is to load the certificate we just created above, the password for the certificate and the subscription Id. Next we create a new SqlManagementClient on line 30. Finally we use this client to create a new SQL server in the West US region. If you head over to the management portal after having run this code you’ll find a brand new server has been created. It is just that easy. There is a part in one of the Azure Friday videos in which Scott Guthries talks about how much faster it is to provision a server on Azure than to get your IT department to do it. Now you can even write building a server into your build scripts.

2014-02-24

Parsing HTML in C# Using CSS Selectors

A while back I blogged about parsing HTML in C# using the HTML Agility Pack. At the end of that post I mentioned that the fizzler library could be a better way of selecting elements in HTML. See the Agility Pack uses XPath queries to find elements which match selectors. This is contrary to the CSS3 style selectors which we’re use to using in jQuery’s Sizzle engine.

For instance in XPath to find the comic image on an XKCD page we used

//div[@id=’comic’]//img

using a CSS3 selector we simply need to do

#comic>img

This is obviously far more terse and yet easy to understand. I’m not sure who designed these selectors but they are jolly good. Unfortunately not all of the CSS3 selectors are supported, however I didn’t find a gaping hole when I tried it. Fizzler is actually built on the HTML Agility Pack so if you’re really stuck with a CSS3 query which doesn’t work then you can drop back to using simple XPath.

So if we jump back into the same project we had before then we can replace the XPath queries

with

For queries which are as simple as the ones here either XPath or CSS3 aren’t that different. However you can build some pretty complicated queries which are much more easily represented in CSS3 selectors than XPath. I would certainly recommend Fizzler now because of the general familiarity with CSS3 selectors that jQuery has brought to the development community.

2014-02-20

Background Tasks In ASP.net

Earlier this week there was a great blog post over at Hanselman’s blog about what not to do when building an ASP.net website. There was a lot of good advice in there but right at the bottom of the list was the single most important item, in my opinion €Long Running Requests (>110 seconds)€. This means that you shouldn’t be tying up your precious IIS threads with long running processes. Personally I think that 110 seconds is a radically long time. I think that a number like 5 seconds is probably more reasonable, I would also entertain arguments that 5 seconds is too long.

If you look into running recurring tasks on IIS you’re bound to find Jeff Atwood’s article about using cache expiration policy to trigger periodic tasks. As it turns out this is a bad idea. Avoiding long running requests is important for a number of reasons:

  1. There are limited threads available for processing requests. While the number of threads in the app pool is quite large it is possible to exhaust the supply of threads. Long running processes lock up threads for an irregularly long period of time.

  2. The IIS worker process can and does recycle itself every 29 hours. If your background task is running during a recycle it will be reaped.

  3. Web server are just not designed to deal with long running processes, they are designed to rapidly create pages and serve them out.

Fortunately there are some great options for dealing with these sorts of tasks now: queues and separate servers. Virtual servers are dirt cheap now on both Azure and Amazon. Both of these services also have highly robust and scalable queueing infrastructures. If you’re not using the cloud then there are infrastructure based queueing services available too (sorry, I just kind of assume that everybody is using the cloud now).

Sending messages using a queue is highly reliable and extremely easy. To send a message using Azure you have two options: Service Bus and Storage Queues. Choosing between the two technologies can be a bit tricky. There is an excellent article over at Microsoft which describes when to use each one. For the purposes of simply distributing background or long running tasks either technology is perfectly viable. I like the semantics around service bus slightly more than those around storage queues. With storage queues you need to continually poll for new messages. I’m never sure what a polite polling interval is so I tend to err on the side of longer intervals such as 30 seconds. This makes the user experience worse.

Let’s take a look at how we can make use of the service bus. First we’ll need to set up a new service bus instance. In the Azure portal click on the service bus tab.Screen Shot 2014-02-19 at 8.55.24 PM
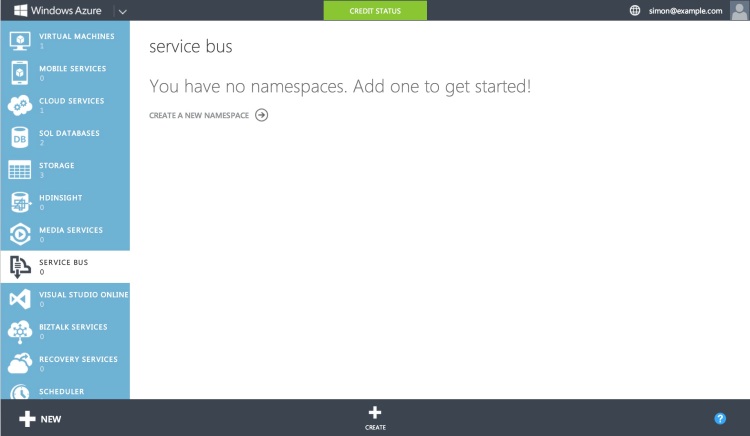
Now click create

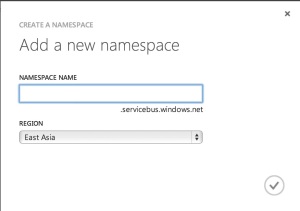
Screen Shot 2014-02-19 at 8.55.41 PMYou can enter a name here and also a region. I’ve always figured that I’m closer to West US so it should be the most performant(although I really should benchmark that).
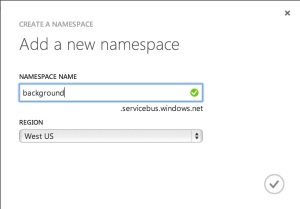
Screen Shot 2014-02-19 at 8.58.23 PMThe namespace serves as a container to keep similar services together. Within the namespace we’ll create a queue

Screen Shot 2014-02-19 at 9.55.56 PM

Once the queue is created it needs to have some shared access policies assigned. I followed the least permission policy and created two policies, one for the web site to write and one for whatever we create to read from the queue.

Screen Shot 2014-02-19 at 10.04.28 PM

The final task in the console is to grab the connection strings. You’ll need to save the configuration screen and then hop back to the dashboard where there is a handy button for pulling up the connection strings. Take note of the write version of the connection string we’ll be using it in a second. The read version will be later in the article.
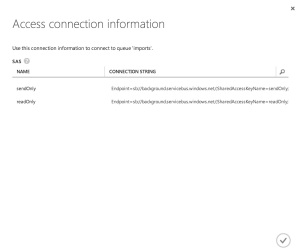
Screen Shot 2014-02-19 at 10.29.52 PMNow we can switch over to Visual Studio and start plugging in the service bus. I created a new web project and selected an MVC project from the options dialog. Next I dropped into the package manager console and installed the service bus tools

Install-Package WindowsAzure.ServiceBus

The copied connection string can be dropped into the web.config file. The nuget install actually adds a key into the appSettings and you can hijack that key. I renamed mine because I’m never satisfied(don’t worry I changed the secret in this code).

In the home controller I set up a simple method for dropping a message onto the service bus. One of the differences between the queue and service bus is that the queue only takes a string as a message. Typically you serialize your message and then drop it into a message on the queue. JSON is a popular message format but there are numerous others. With service bus the message must be an instance of a BrokeredMessage. Within that message you can set the body as well as properties on the message. These properties should be considered part of the €envelope€ of the message. It may contain meta-information or really anything which isn’t part of the key business meaning of the message.

This is all it takes to send a message to a queue. Service bus supports topics and subscriptions as well as queues. This mechanism provides for semantics around message distribution to multiple consumers, it isn’t needed for our current scenario but could be fun to explore in the future.

Receiving a message is just about as simple as sending it. For this project let’s just create a little command line utility for consuming messages. In a cloud deployment scenario you might make use of a worker role or a VM for the consumer.

The command line utility needs only read from the queue which can be done like so:

There are a couple of things to note here. The first is that we’re using a tight loop which is typically a bad idea. However the Receive call is actually a blocking call and will wait, for a time, for a message to come in. The wait does time out eventually but you can configure that if needed. I can imagine very few scenarios where changing the default timeout would be of use but others have better imaginations than me.

The second thing to note are the calls to message.Complete and message.Abandon. We’re running the queue in PeekLock mode which means that while we’re consuming the message the read on the queue is blocked. You can still write to the queue but reading is not possible. Once we’ve handled the message we either need to mark it as complete, meaning that the message will be deleted from the queue, or abandoned, meaning that the message will simply be unlocked and available to read again.

That is pretty much all there is to shifting functionality off of the web server and onto a standalone background/long running task server. It is super simple and will typically be a big improvement for your users.

As usual the source code for this is available up on github

2014-02-10

Quick A/B Testing in ASP.net MVC "“ Part 4 Seeing your data

This blog is the fourth and final in a series about how to implement A/B testing easily in ASP.net MVC by using Redis

  1. Having 2 pages
  2. Choosing your groups
  3. Storing user clicks
  4. Seeing your data

Now that we’ve been running our tests for some time and have a good set of data built up it is time to retrieve and examine the data.

We’ve been following a pretty convention based approach so far: relying on key names to group our campaigns. This pays off in the reporting interface. The first thing we do is set up a page which contains a list of all the campaigns we’re running.

This code retrieves all the keys from redis and passes them off to the view. The assumption here is that the entire redis instance is dedicated to running AB testing. If that isn’t the case then the A/B testing data should be namespaced and the find operation can take a prefix instead of just *. I should warn that listing all the keys in Redis is a relatively slow operation. It is not recommended for typical applications. I am confident the number on this site will remain small so I’ll let it slide for now. A better approach is likely to store the keys in a Redis set.

In the view we’ll just make a quick list out of the passed in keys, filtering them into groups.

For our example this gives us

Screen Shot 2014-02-07 at 4.09.43 PMFor the details page things get slightly more complicated.

Here we basically look for each of the subkeys for the passed in key and then get the total hits and successes. If your subkeys are named consistently with A, B, C then this code can be much cleaner and, in fact, the key query to Redis can be avoided.

Finally in the view we simply print out all of the keys and throw a quick progress bar in each row to allow for people to rapidly see which option is the best.

Screen Shot 2014-02-07 at 4.12.54 PMThe code for this entire project is up on github athttps://github.com/stimms/RedisAB

2014-02-06

Postmark Incoming Mail Parser

If you’re deploying a website or tool to Azure and need to send e-mail you may already have discovered that it doesn’t work. To send e-mail there are a ton of third party services into which you can hook. I’ve been making use of Postmark for my sites. Honestly I can’t remember why I picked them. They have a nice API and offer 10 000 free credits. Subsequent credits are pretty reasonably priced too.

One of the cool features they have is the ability to accept incoming e-mail. This opens up a whole new world of interactivity with your application. We have a really smart use for it Secret Project Number 1, about which I can’t tell you. Sorry :(

When I checked there was no library for .net to parse the incoming mail. Ooop, well there’s an opportunity. So I wrote one and shoved it into nuget.

https://github.com/stimms/PostmarkIncomingMailParser

Using it

First you should set up a url in the postmark settings under the incoming hook. This should be the final URL of your published end point. Obviously there cannot be a password around the API as there is nowhere to set it. That might be something Postmark would like to change in the future.

The simplest way to set up a page to be the endpoint is to set up a ASP.net MVC WebAPI page. It can contain just a single method

public async void Post()
{
    var parser = new PostmarkIncomingMailParser.Parser();
    var mailMessage = parser.Parse(await Request.Content.ReadAsStringAsync());
    //do something here with your mail message
}

The mail message which is returned is an extension of the standard System.Net.MailMessage. It adds a couple of extra fields which are postmark specific

-MessageId ““ the ID of the message from postmark
-Date ““ the date of the message (see the issues section)

There is a sample project in git which makes use of WebAPI. And that’s all I have to say about that.

2014-02-03

The Craziest Technology You'll Read about today

Sorry for the alarmist title, I swear that I’m not attempting to bait your clicks”¦ well not much. This is awesome. I was talking with a couple of guys who work at a directional drilling company. They drill conventional oil recovery wells in order to extract a substance made from bits of old plants and animals. Drilling is way more complicated at that scale than the drilling a hole in you wall scale. The holes are thousands of feet down and, in many cases, in a weird crooked line (hence the directional drilling part). You have to do that because it may be more efficient to drill through a certain substrate at 500 feet and then move over a bit at 1000 feet. The level of accuracy these guys can do now is out of this world.

I was really intrigued about how they got information back from the drill head. There are tons of interesting readings you can gather from the head but the problem is that it is way under ground. Getting that data back is difficult. I have trouble getting wi-fi in my bedroom when the router is in the living room so clearly wi-fi is out as a technology.

Running a cable down there is also difficult. Unlike the putting a picture on the wall sort of drill these drills have lubricants and rock cuttings to deal with. Mud is pumped down the inside of the shaft and then recovered out the sides.

Thanks to the Energy Institute for this picture - http://www.energyinst.org/homeThanks to the Energy Institute for this picture ““ http://www.energyinst.org/home

This means that any cable path is already full of highly abrasive mud. The guys told me that does work but it is flaky and you end up spending a lot of time replacing cables and also signal boosters every 200 or 300 feet.

Another way is to use low frequency radio waves which are a bit better than wi-fi at getting through rock. However there are some rocks through which it just doesn’t work to send radio waves.

The final method, and the coolest, is to use mud pulses. The mud being pumped down the well is at huge pressure (as you would expect from pumping mud). On the drill head there is a valve which can be opened and closed by the sensors on the drill head. When closed the pressure in the mud pumps increases and when opened it decreases. They literally send pulse waves through the mud they’re pumping into the well and measure them at the surface. It is outrageously low bandwidth but that it actually works at all is amazing to me. It is effectively a digital signal in mud. What a cool application of technology!

It gets better, though. If you have a valve with various open and closed settings you can vary the pressure to create a waveform varying both amplitude and frequency.

At shallow depths you can get as much as 40bit/s through mud pulsing although at deeper depths that drops off significantly to perhaps 1.5bit/s at 12 000m. 40 bit/s means that we’re running at 40Hz which is fricking huge for a mechanical valve under that much pressure to open and close.

I would not have invented this.

2014-01-28

Illegal file name characters

If you’re code is interacting with the file system at all in Windows then you might want to think about what sort of protection you have in place for illegal characters in file names. Previously my code was checking only a handful, a handful I got from looking at the error message windows gives you when you attempt to rename a file using one of these characters.

Image

This is but the tip of the iceberg. Instead use something like this

*Efficiency of this code not tested and probably terrible

2014-01-27

Building Redis keys

I was having a discussion with somebody the other day and wanted to link them to an article on how you can use compound names as effective keys in key value stores like Redis. Weirdly I couldn’t find a good article on it. Perhaps my google-fu (actually duck-duck-go-fu now) isn’t as strong as I thought or perhaps there isn’t an article. In either case this is now going to be an article on how to build keys for KV stores.

KV-stores are one of the famed NOSQL databases. There are quite a few options for key value storesthese days, I like Redis and I’ve also made use of Azure’s blob storage which is basically a key value store. KV-stores are interesting in that they are highly optimized for looking things up by a known key. Unlike relational databases you can’t easily query against the values. This means that there is no doing

select * from users where name like ‘John%’

to find all the users with a first name of John. This isn’t the sort of operation for which key value stores are good. You can list keys in Redis by using the KEYS command but it is generally not encouraged as it isn’t performant. You really need to know the key for which you’re looking.

The KV key can be stored in another storage system like a relational database. Perhaps you might store several indexes of keys in the relational database, filter and retrieve sets of them and then pull the records from the KV-store. So say you have a list of trees you want to store. In the relational database you can create a table of tree types (coniferous, deciduous, carnivorous) and the Redis keys. You also store the maximum heights and keys in the relational database. The details of the trees go into Redis for rapid retrieval. First query against the relational database then against the KV store.

Sounds unnecessarily complicated? Yeah, I think so too. The better approach is to use a key which can be constructed without need to query another data store explicitly. If we had a database of historical values of temperatures in all of North America then we could build our keys to make them match our data access pattern. The users for this database are most interested in looking up values for their hometown on specific days. Thus we’ve constructed our keys to look like

:<state/province>::::

This allows us to build up a key programmatically from the user’s query

GET US:NewYork:Albany:1986:01:15 -> -8

We can be even smarter and build keys like

:<state/province>:::::Max :<state/province>:::::Min

For more detailed information. They take away here is that you can build large and complex keys based on hierarchical data to make your lookups run in O(1) time, which is also known as O(jolly quick) which is a good place to be. Creating effective keys requires that you know about your access patterns ahead of time but that’s true of most databases, even in a relational database you have to pick your indexes based on access patterns.

2014-01-20

Quick A/B Testing in ASP.net MVC - Part 3 Storing clicks

This blog is the third in a series about how to implement A/B testing easily in ASP.net MVC by using Redis

  1. Having 2 pages
  2. Choosing your groups
  3. Storing user clicks
  4. Seeing your data

So far we’ve seen how to select pages semi randomly and how to have two different views. In this post we’ll figure out a way of storing the click through statistics on the server. For the server I’ve chosen Redis. My reasoning was largely around how simple programming against Redis is and also that it has a built in primitive which allows for incrementing safely. At the time of writing Redis doesn’t have good support for clustering (wait until version 3!) but there is support for master-slave configurations. Weirdly our data access pattern here is more writes than reads, so having a multi-master setup might be better.For most purposes a single master should be enough to support A/B record keeping as Redis is very fast and 99% of websites aren’t going to be taxing for it. If you really are getting more hits than a Redis server can handle then perhaps reduce the percentage of people who end up doing the testing.

Redis is likely better run on a Linux box than Windows. Although there is a Windows version it was developed largely by Microsoft and it not officially supported. At the current time there are no plans to merge the Windows support back into mainline. Still the Windows version will work just fine for development purposes. I installed Redis using ChocolateyNuget

cinst redis

You can do that or download the package and do it manually.

There are a couple of .net clients available for Redis but I went with one called Booksleeve which was developed by the Stackoverflow team. This can be installed from nuget

install-package booksleeve

Now we need to write to Redis as needed. I created a simple interface to handle the logging.

LogInitialVisit is called whenever somebody visits and A/B page and LogSuccess is used when the user has performed the activity we want. The initial visit call can be hooked into the BaseController we created in part 1.

The actual Redis implementation of IABLogger looks like:

In a real implementation just using localhost for the Redis server is likely not what you want. What isn’t apparent here is that the call to Redis is performed asynchronously inside Booksleeve so this should have very little impact on the speed of page rendering.

The initial visit counter should be correctly updated. Now we need a way to update success counter. There are a couple of approaches to this but I think the best is simply to provide an end point for the views to call out for when “success” is achieved. Success can be visiting a link or just pausing on the page for a period of time; an endpoint which accepts POSTs is sufficiently flexible to handle all eventualities.

The controller looks like

I’m a big fan to TypeScript so I wrote my client side code in TypeScript

The ready function at the end hooks up links which have appropriate data- attributes. This does mean that a post is sent to our server before sending people on to their final destination. Google does more or less the same thing with search results.

If we check the results in Redis we can see that appropriate keys have been created and values set.

redis 127.0.0.1:6379> keys About* 1) “About.AboutA.success” 2) “About.AboutB.success” 3) “About.AboutA” 4) “About.AboutB” redis 127.0.0.1:6379> get About.AboutA “8” redis 127.0.0.1:6379> get About.AboutA.success “1”

In the next part we’ll look at how to retrieve and analyse the statistics we’ve gathered.