2014-04-03

Checking Form Re-submissions in CasperJS

ASP.net WebForms has a nasty habit of making developers comfortable with using POST for pretty much everything. When you add a button to the page it is typically managed via a postback. This is okay for the most part but it becomes an issue when using the back button. See HTTP suggests that things which are POSTed are actual data changes where as GETs are side effect free. Most browsers save you from messing up with the back button by simply throwing up an warningformresubmission

This warning is not something we want our users to have to see. Without some understanding of how browsers work it is confusing to understand why users are even seeing this error. On my agenda today is fixing a place where this is occurring.

The first step was to get a test in place which demonstrated the behaviour. Because it is a browser issue I turned to our trusty CasperJS integration tests and wrote a test where I simply navigated to a page and then tried to go back. The test should fail because of the form resubmission.

It didn’t.

Turns out that CasperJS(or perhaps PhantomJS on which it is built) is smart enough to simply agree to the form submission. Bummer.

To test this you need to intercept the navigation event and make sure it isn’t a form re-submission. This can be done using casper.on

If you add this before the test then navigate around an exception will be thrown any time a form is resubmitted automatically. Once your testing is done you can remove the listener with casper.removeAllListeners.

Now on to actually fixing the code”¦

2014-04-01

Hacking Unicoin for Really no Reason

It is April 1st today which means that all manner of tom-foolery is afoot. Apart from WestJet’s brilliant “metric time“ joke the best one I’ve seen today is Stack Overflow’s introduction of Unicoin which is a form of digital currency which can be used to purchase special effects on their site.

unicoin

To get Unicoin you have two options: buy it or mine it. I have no idea if buying it actually works and at $9.99 for 100 coins I’m not going to experiment to see if you can actually purchase it. Mining it involves playing a fun little game where you have to click on rocks to uncover what they have under them(could be coins, could be nothing).

unicoin2

I played for a few minutes but got quickly tired of clicking. I’m old and clicking takes a toll. To unlock all the prizes you need to have about 800 coins (799 to be exact). So I fired up the F12 developer tools to see if I could figure out how the thing was working.

As it turns out there are two phases to showing and scoring a rock. The first one is rock retrieval which is accomplished by a GET tohttp://stackoverflow.com/unicoin/rock?_=1396372372225 or similar. That parameter looked familiar to me and, indeed, it is a timestamp. This will return a new “rock” which is just JSON

{“rock”:”DAUezpi1zrfxHRxdi3yp9JUCZ9vwABJbDA”}

The value appears to be some sort of randomly generated value. Doesn’t really matter for our purposes. The response once a rock is mined is to POST to

http://stackoverflow.com/unicoin/mine?rock=DAUezpi1zrfxHRxdi3yp9JUCZ9vwABJbDA

in the body of that POST you’ll need an fkey which can be found by looking at the value in StackExchange.options.user.fkey.

Once you know that stealing coin is as easy as

There appears to be some throttling behaviour built in so I ran my requests every 15 seconds. Hilariously if you don’t include the fkey the server will respond with HTTP 418, an April Fools inside and April Fools. Now you can buy whatever powerups you want

unicoin3

Update: The rate at which I’m discovering new Unicoins has dropped off rapidly. I was discovering coins on almost every hit originally now it is perhaps 1:20. Either I’m being throttled or the rate of discovery of new coins reduces as more of the keyspace has been explored like Bitcoin. I really hope it is the second one, that would be super nifty.

2014-03-29

Octokit.net - Quickstart

I’m working on a really nifty piece of code at the moment which interacts with a lot of external services and aggregate the data into a dashboard. One of the services with which I’m working is github. My specific need was, given a commit, what was the commit message?

GitHub have a great RESTful API for just this sort of thing and they even have a .net wrapper library for the API called Octokit.net. It seems to bind most of the API, which is great. It also seems to have no real documentation, which is not.

The repositories against which I wanted to fire the API were part of an organization and were private so I needed to authenticate. You have two options for authenticating against the API: basic or OAuth. As my service was going to be used by people who don’t have github credentials the OAuth route was out. Instead I created a new user account and invited it into the organization. It is always smart to give as few permissions as possible to a user so I created a new team called API in the organization and made the API user its only member. The API team got only read permission and only to the one repository in which I was interested.

Next I dropped into my web project and added app settings for the user name and password. I use a great little tool called T4AppSettings which is available in nuget. It is a T4template which reads the configuration sections in your web.config or app.config and makes them into static strings so you don’t need to worry about missing one in a renaming. The next step was to add a reference to Octokit

install-package octokit

in the package manager console did that. Then we new up some credentials based on our app settings

Next create a connection

The product header values seems to just be any value you want. I’m sure there is some reason behind it but who knows what”¦ Now we need to get the octokit client based on this connection.

That is all the boring stuff out of the way and you can start playing around with it. In my case I had a list of objects which contained the commit versions and I wanted to decorate them with the descriptions

This was actually what took me the longest. The parameters to the Get were not well named so I wasn’t sure what should go in them. Turns out the first one is the name of the owner where the owner is either the organization or the user. The second one is the name of the repository. So for this repositoryrepothe owner is alexwolfe and the repository name is Buttons.

The GitHub API is rich and powerful. There is a ton to explore and many ways to get into trouble.Take chances,makemistakes,get messy.

2014-03-24

Where is my tax software?

It is tax season again here in Canada which always makes me angry. A little bit because I have to pay my taxes (who likes that?) but mostly because of tax software. Doing taxes by hand isn’t all that bad but we live in the 21st century and doing taxes like that is old school; we use computers these days.

There are a lot of options out there for software to help with doing taxes. QuickTax, Cantax and, I kid you not, Taxtron are all good options. But there is one piece of tax software which I never see and I should: whatever tax software the Canada Revenue Agency use internally. Let me walk through this:

Every year almost everybody in the country fills in some form of tax filing and sends it to the government. Let’s use a Fermi estimationto figure out how much paper work the government has to do. There are about 35 million people in Canada. Perhaps 25% of them aren’t filing taxes because they’re too young. A few more people don’t file taxes for a variety of other reasons so let’s say that 25 million people file taxes. Each person is likely to have at least five forms plus the actual tax form themselves, let’s say 20 pages all told. So that means that the government can expect to get something on the order of 500 million pieces of paper.

That’s a lot of paper! Even with netfile, the electronic filing system, it is a mountain of data to process. There is no way that this amount of paperwork is being done by hand. There must be some software which is processing this data. What’s more every year I receive a notice that they’ve assessed my taxes and found them to be correct.

This means that not only is their software handling filing the taxes it is also performing a cross checking function. My argument is that this software should be made public, what’s more this software should be open sourced.

By making the software available to everybody we tax payers can perform our own cross check to ensure that our filings are correct. If we wanted we could use the software to actually fill out our taxes. This has the potential to save us millions of dollars spent on buying tax software. For those for whom buying tax software is a burden this could be a great boon. I don’t worry very much that giving away the government’s software would necessarily put the traditional tax software companies out of business, either. Their selling feature would be ease of use. Goodness knows that the software the government uses internally isn’t likely to be very user friendly. What’s worse is that the software may not be very good.

This software handles billions of dollars every year. Billions of dollars which fund our schools, roads, military and everything else in between. Allowing the population to test and audit this software is quintessentially democratic. For many of us paying taxes is the only time we interact directly with the government all year. If we cannot be sure that the government is getting this most basic interaction right how can we trust them to deal with more pressing issues?

Opening this software up and providing it for general consumption should be a priority. Our taxes paid for the software to be developed in the first place and any government which values transparency should be delighted to open it up.

Free our tax software.

2014-03-12

Breaking Excel Passwords

If you’ve ever built and sold an excel add-in written in VBA you’ve probably wanted to hide your code so that nobody else can get a hold of it. The problem with VBA is that it is pretty easy to extract and edit. Microsoft have, over the years, made some attempts to lock down the file format with passwords and encryption and the such. They generally haven’t worked very well.

Today I encountered a very solid attempt to thwart user editing of VBA. Typically you just need to follow the steps listed on StackOverflow. This time, however, these tricks didn’t work. When attempting to expand the project node in the VBA editor this error was thrown:

Screen Shot 2014-03-11 at 10.54.23 PMTypically this Project Locked ““ Project is unviewable error is shown the excel file has been placed into shared mode. Shared mode disables all editing of VBA. Setting the workbook to shared mode and then exclusive mode is usually enough to clear this flag. In this case, though, that didn’t help. I suspect that the author of this particular excel file had used one of the tools for locking VBA. This tool must, in some way, set the shared flag in a way that it cannot be unset.

I went down many a blind alley trying to solve this. VBA code is not stored in a text format but rather in a binary blob which lives inside the open Office Open XML format: vbaProject.bin. This file format is outline a bit by Microsoft in a long and probably very boring document. I say “probably very boring” because I didn’t read it. I would be very interested in looking at this file in a hex editor and seeing what the locking tool changes.

There are some paid services out there which promise to unlock your file. That all seemed pretty sketchy to me.

Fortunately the locking of this binary file is ignored by other tools. I used a great little tool called VBADiffwhich was able to extract the majority of what was needed from the excel file. It wasn’t able to extract the forms but they were pretty easily recreated.

I’m super impressed with the excel locking tool and the author’s knowledge of the excel file format. However even all that work was still bypassed with few hours work. It goes to show that any code running on your machine can be exploited.

2014-03-03

ASP.net Identity Default Cookie Expiry

I couldn’t find how long the cookie expiry for a cookie based identity token is for ASP.net Identity anywhere in any documentation. I ended up decompiling Microsoft.Owin.Security.Cookies in which that property is defined. The default expiry is 14 days with a sliding expiration window.

The full set of defaults looks like:

UPDATE: Pranav Rastogiwas kind enough to point out that the source code for this module is part of the Katana Project and is available on codeplex

2014-03-03

Automating Azure Deployments

I’m a pretty big fan of what Microsoft have been doing as of late with Azure. No matter what language you develop in there is something in Azure for you. They have done a good job of providing well sized application building blocks. I spent about a week digging into Amazon Web Services and Azure to help out with an application deployment at work. Overall they are both amazing offerings. When I’m explaining the differences to people I talk about how Amazon started with infrastructure as a service and are now building platform as a service. Azure started at the opposite end: platform as a service, and are working towards infrastructure as a service.

Whether one approach was better than the other is still kind of up in the air. However one area where I felt like Amazon was ahead of the game was in provisioning servers. This isn’t really a result of Amazon stepping up so much as it is a function of tools like Chef and Puppet adopting Amazon over Azure. Certainly Cloud Formation, Amazon’s initial offering in this space, is good but Chef/Puppet are still way better. I was a bit annoyed that there didn’t’ seem to be any answer to this from Microsoft. It wouldn’t be too difficult for them to drop 10 engineers into the Chef and Puppet teams to allow them to deploy on Azure. Then I remembered that they were taking the platform before infrastructure approach. I was approaching the situation incorrectly. I shouldn’t be attempting to interact with Azure at this level for the services I was deploying to websites and SQL Azure.

One thing about the Azure portal which is not super well publicized is that it interacts with Azure proper by using RESTful web services. In a brilliant move Microsoft opened these services up to anybody. They are pretty easy to use directly from Curl or something similar but you need to sign your requests. Fortunately I had just heard of a project to wrap all the RESTful service calls in nice friendly managed code.

In a series of articles I’m going to show you how to make use of this API to do some pretty awesome things with Azure.

Certificates

The first step is to create a new management certificate and upload it to Azure. I’ll assume you’re on Windows but this can all be done using pure OpenSSL on any platform as well.

  1. Open up the Visual Studio Command prompt. If you’re on Windows 8 you might have to drop to the directory directly as there is no hierarchical start menu anymore.C:Program Files (x86)Microsoft Visual Studio 12.0Common7ToolsShortcuts.

  2. In the command prompt generate a certificate using

makecert -sk azure -r -n “CN=azure” -pe -a sha1 -len 4096 -ss azureManagement

This will create a certificate and put it into the certificate manager on windows. I’ve used a 4096 bit key length here and sha1. It should be pretty secure.

  1. Open the certificate manager by typing

certmgr.msc

into the same command prompt.

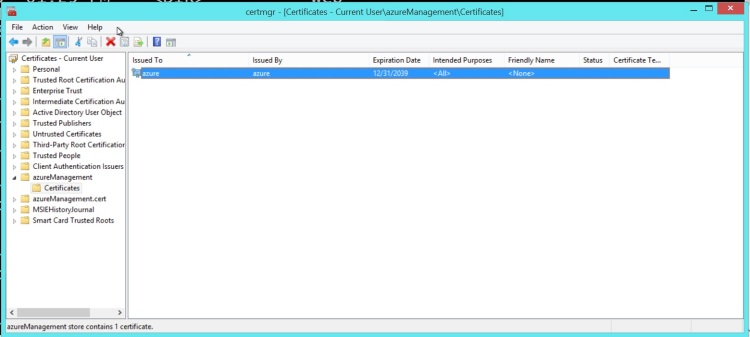
  1. In the newly opened certificate manager you’ll find a folder named azureManagement. Open up that folder and the Certificates folder under it to find your key.

Screen Shot 2014-03-02 at 8.30.08 AM5. Right click on that key and select Tasks > Export

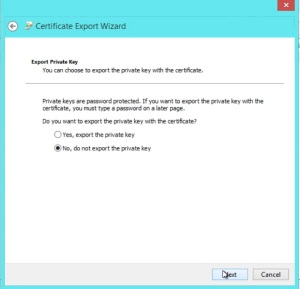
  1. Select “No, export a public key”

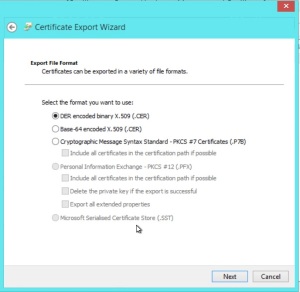
Screen Shot 2014-03-02 at 8.33.52 AM7. In the next step select the Der encoded key

Screen Shot 2014-03-02 at 8.33.22 AM

  1. Enter a file name into which to save the certificate.

You have now successfully created an Azure management key. The next step is to upload it into Azure.

  1. In the management portal click on on settings

  2. In the settings section select the Management Certificates tab.

  3. Click upload and select the newly created .cer file.

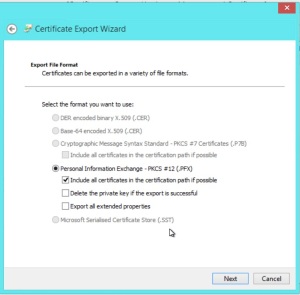
You now have the Azure half of the certificate complete. The next step is to get the client side of the certificate, a .pfx file, out. This is done in much the same way as the the private key, except this time select “Yes, export the private key”.

  1. Right click on the certificate, select tasks then export

  2. Select “Yes, export the private key”

Screen Shot 2014-03-02 at 1.43.49 PM

  1. The default options on the next screen are fine

Screen Shot 2014-03-02 at 1.45.25 PM4. Finally enter a password for the pfx file. The combination of password and certificate are what will grant you access to the site.

Creating a Database

There is a ton of stuff which you can do now that you’ve got your Azure key set up and I’ll cover more of it in coming posts. It didn’t seem right to just teach you how to create a key without showing you a little about how to use it.

We’ll just write a quick script to create a database. Start with a new console application. In the package manager run

Install-Package Microsoft.WindowsAzure.Management.Libraries -Pre

At the time of writing you also need to run

Install-Package Microsoft.WindowsAzure.Common -Pre

This is due to a slight bug in the nuget packages for the management libraries. I imagine it will be fixed by the next release. The libraries aren’t at 1.0 yet which is why you need the -Pre flag.

The code for creating a new server is simple.

First step in the GetCredentialson line 21 is to load the certificate we just created above, the password for the certificate and the subscription Id. Next we create a new SqlManagementClient on line 30. Finally we use this client to create a new SQL server in the West US region. If you head over to the management portal after having run this code you’ll find a brand new server has been created. It is just that easy. There is a part in one of the Azure Friday videos in which Scott Guthries talks about how much faster it is to provision a server on Azure than to get your IT department to do it. Now you can even write building a server into your build scripts.

2014-02-24

Parsing HTML in C# Using CSS Selectors

A while back I blogged about parsing HTML in C# using the HTML Agility Pack. At the end of that post I mentioned that the fizzler library could be a better way of selecting elements in HTML. See the Agility Pack uses XPath queries to find elements which match selectors. This is contrary to the CSS3 style selectors which we’re use to using in jQuery’s Sizzle engine.

For instance in XPath to find the comic image on an XKCD page we used

//div[@id=’comic’]//img

using a CSS3 selector we simply need to do

#comic>img

This is obviously far more terse and yet easy to understand. I’m not sure who designed these selectors but they are jolly good. Unfortunately not all of the CSS3 selectors are supported, however I didn’t find a gaping hole when I tried it. Fizzler is actually built on the HTML Agility Pack so if you’re really stuck with a CSS3 query which doesn’t work then you can drop back to using simple XPath.

So if we jump back into the same project we had before then we can replace the XPath queries

with

For queries which are as simple as the ones here either XPath or CSS3 aren’t that different. However you can build some pretty complicated queries which are much more easily represented in CSS3 selectors than XPath. I would certainly recommend Fizzler now because of the general familiarity with CSS3 selectors that jQuery has brought to the development community.

2014-02-20

Background Tasks In ASP.net

Earlier this week there was a great blog post over at Hanselman’s blog about what not to do when building an ASP.net website. There was a lot of good advice in there but right at the bottom of the list was the single most important item, in my opinion €Long Running Requests (>110 seconds)€. This means that you shouldn’t be tying up your precious IIS threads with long running processes. Personally I think that 110 seconds is a radically long time. I think that a number like 5 seconds is probably more reasonable, I would also entertain arguments that 5 seconds is too long.

If you look into running recurring tasks on IIS you’re bound to find Jeff Atwood’s article about using cache expiration policy to trigger periodic tasks. As it turns out this is a bad idea. Avoiding long running requests is important for a number of reasons:

  1. There are limited threads available for processing requests. While the number of threads in the app pool is quite large it is possible to exhaust the supply of threads. Long running processes lock up threads for an irregularly long period of time.

  2. The IIS worker process can and does recycle itself every 29 hours. If your background task is running during a recycle it will be reaped.

  3. Web server are just not designed to deal with long running processes, they are designed to rapidly create pages and serve them out.

Fortunately there are some great options for dealing with these sorts of tasks now: queues and separate servers. Virtual servers are dirt cheap now on both Azure and Amazon. Both of these services also have highly robust and scalable queueing infrastructures. If you’re not using the cloud then there are infrastructure based queueing services available too (sorry, I just kind of assume that everybody is using the cloud now).

Sending messages using a queue is highly reliable and extremely easy. To send a message using Azure you have two options: Service Bus and Storage Queues. Choosing between the two technologies can be a bit tricky. There is an excellent article over at Microsoft which describes when to use each one. For the purposes of simply distributing background or long running tasks either technology is perfectly viable. I like the semantics around service bus slightly more than those around storage queues. With storage queues you need to continually poll for new messages. I’m never sure what a polite polling interval is so I tend to err on the side of longer intervals such as 30 seconds. This makes the user experience worse.

Let’s take a look at how we can make use of the service bus. First we’ll need to set up a new service bus instance. In the Azure portal click on the service bus tab.Screen Shot 2014-02-19 at 8.55.24 PM
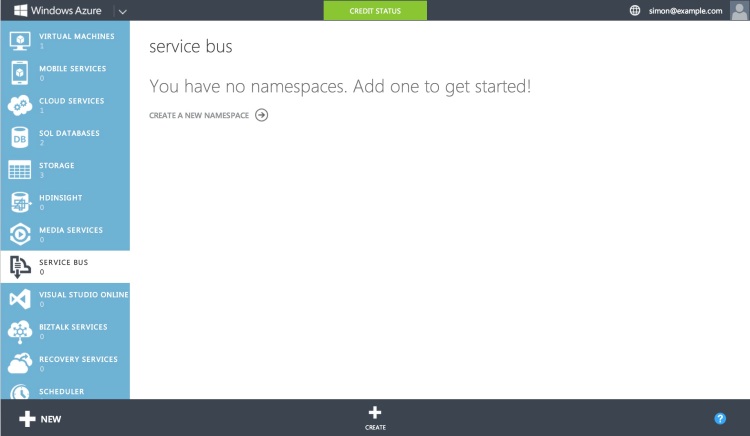
Now click create

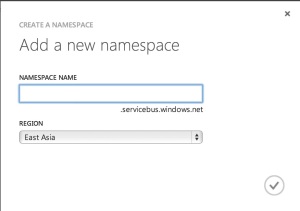
Screen Shot 2014-02-19 at 8.55.41 PMYou can enter a name here and also a region. I’ve always figured that I’m closer to West US so it should be the most performant(although I really should benchmark that).
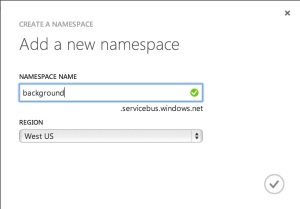
Screen Shot 2014-02-19 at 8.58.23 PMThe namespace serves as a container to keep similar services together. Within the namespace we’ll create a queue

Screen Shot 2014-02-19 at 9.55.56 PM

Once the queue is created it needs to have some shared access policies assigned. I followed the least permission policy and created two policies, one for the web site to write and one for whatever we create to read from the queue.

Screen Shot 2014-02-19 at 10.04.28 PM

The final task in the console is to grab the connection strings. You’ll need to save the configuration screen and then hop back to the dashboard where there is a handy button for pulling up the connection strings. Take note of the write version of the connection string we’ll be using it in a second. The read version will be later in the article.
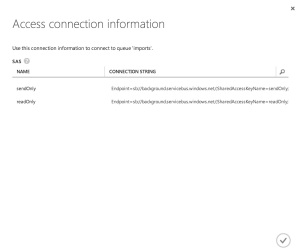
Screen Shot 2014-02-19 at 10.29.52 PMNow we can switch over to Visual Studio and start plugging in the service bus. I created a new web project and selected an MVC project from the options dialog. Next I dropped into the package manager console and installed the service bus tools

Install-Package WindowsAzure.ServiceBus

The copied connection string can be dropped into the web.config file. The nuget install actually adds a key into the appSettings and you can hijack that key. I renamed mine because I’m never satisfied(don’t worry I changed the secret in this code).

In the home controller I set up a simple method for dropping a message onto the service bus. One of the differences between the queue and service bus is that the queue only takes a string as a message. Typically you serialize your message and then drop it into a message on the queue. JSON is a popular message format but there are numerous others. With service bus the message must be an instance of a BrokeredMessage. Within that message you can set the body as well as properties on the message. These properties should be considered part of the €envelope€ of the message. It may contain meta-information or really anything which isn’t part of the key business meaning of the message.

This is all it takes to send a message to a queue. Service bus supports topics and subscriptions as well as queues. This mechanism provides for semantics around message distribution to multiple consumers, it isn’t needed for our current scenario but could be fun to explore in the future.

Receiving a message is just about as simple as sending it. For this project let’s just create a little command line utility for consuming messages. In a cloud deployment scenario you might make use of a worker role or a VM for the consumer.

The command line utility needs only read from the queue which can be done like so:

There are a couple of things to note here. The first is that we’re using a tight loop which is typically a bad idea. However the Receive call is actually a blocking call and will wait, for a time, for a message to come in. The wait does time out eventually but you can configure that if needed. I can imagine very few scenarios where changing the default timeout would be of use but others have better imaginations than me.

The second thing to note are the calls to message.Complete and message.Abandon. We’re running the queue in PeekLock mode which means that while we’re consuming the message the read on the queue is blocked. You can still write to the queue but reading is not possible. Once we’ve handled the message we either need to mark it as complete, meaning that the message will be deleted from the queue, or abandoned, meaning that the message will simply be unlocked and available to read again.

That is pretty much all there is to shifting functionality off of the web server and onto a standalone background/long running task server. It is super simple and will typically be a big improvement for your users.

As usual the source code for this is available up on github

2014-02-10

Quick A/B Testing in ASP.net MVC "“ Part 4 Seeing your data

This blog is the fourth and final in a series about how to implement A/B testing easily in ASP.net MVC by using Redis

  1. Having 2 pages
  2. Choosing your groups
  3. Storing user clicks
  4. Seeing your data

Now that we’ve been running our tests for some time and have a good set of data built up it is time to retrieve and examine the data.

We’ve been following a pretty convention based approach so far: relying on key names to group our campaigns. This pays off in the reporting interface. The first thing we do is set up a page which contains a list of all the campaigns we’re running.

This code retrieves all the keys from redis and passes them off to the view. The assumption here is that the entire redis instance is dedicated to running AB testing. If that isn’t the case then the A/B testing data should be namespaced and the find operation can take a prefix instead of just *. I should warn that listing all the keys in Redis is a relatively slow operation. It is not recommended for typical applications. I am confident the number on this site will remain small so I’ll let it slide for now. A better approach is likely to store the keys in a Redis set.

In the view we’ll just make a quick list out of the passed in keys, filtering them into groups.

For our example this gives us

Screen Shot 2014-02-07 at 4.09.43 PMFor the details page things get slightly more complicated.

Here we basically look for each of the subkeys for the passed in key and then get the total hits and successes. If your subkeys are named consistently with A, B, C then this code can be much cleaner and, in fact, the key query to Redis can be avoided.

Finally in the view we simply print out all of the keys and throw a quick progress bar in each row to allow for people to rapidly see which option is the best.

Screen Shot 2014-02-07 at 4.12.54 PMThe code for this entire project is up on github athttps://github.com/stimms/RedisAB