Azure Functions and Azure B2C Authentication
I had a pretty good struggle setting up Azure Functions and Azure B2C to work together. There are a few guides out there but I wanted to put my own together because I had a terrible time finding these posts initially. The scenario here is that we want a single page application written in React to talk to an API hosted entirely in Azure Functions such that the functions are authenticated.
Azure
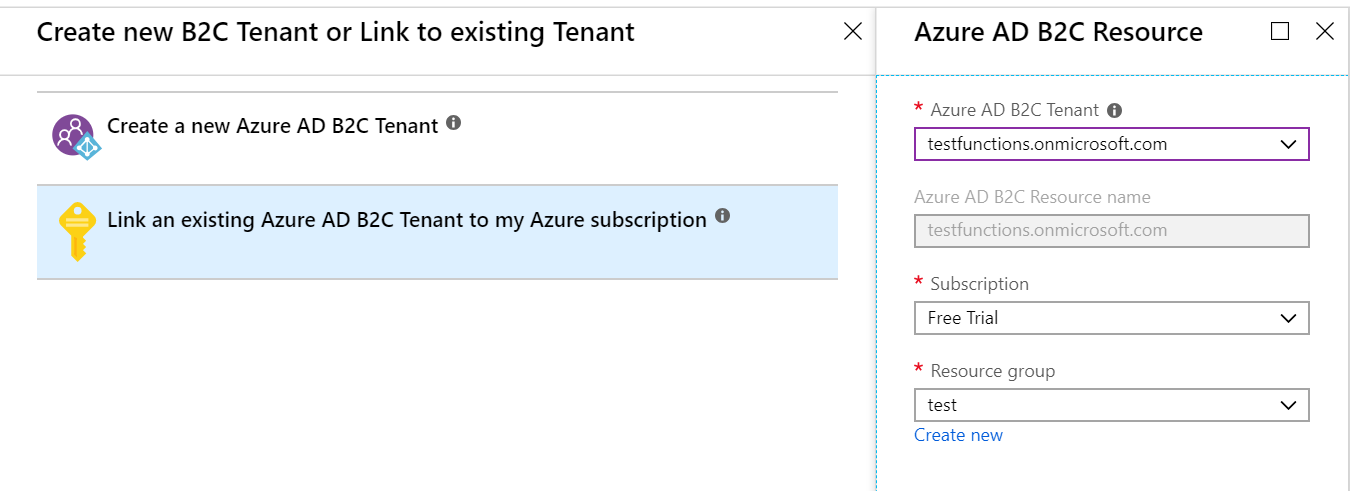
First up you’ll need to create a new tenant for Azure B2C. This is a weird two step process which I’m given to understand is going to be improved at some point in the near future. For now in the Azure Portal select Create a resource then Azure B2C. You’ll be presented with these two options.

To start you’ll need to create a tenant, so pick the first one. You’ll be presented with a few options for organization name and initial domain. These are specific to your organization so I’ll leave them up to you but think on the names a little because they cannot be changed.
With the B2C tenant created you’ll now need the second option to link an existing Azure AD B2C tenant to the Azure subscription. This will create a reference to your tenant in your main Azure subscription.
Managing tenants is very confusing because you need to actually switch your Azure portal over to the new tenant. This is the least intuitive part of the process in my mind and shouldn’t have been implemented this way. So click on the account selector in the top right of the portal to switch directories. Once you’re in the new directory you’ll see all the various resources you’re use to. Don’t both touching those, head straight over to Azure AD B2C in All resources.
In here you’ll want to start in the Applications section. We’ll be creating two applications and defining some claims between them. One application will be for the functions and the other for the SPA. You can expand this to more applications as your application grows.
The SPA should be the first one you create. I, creatively, called mine SPA. This one does not need an App ID URI but you should allow implicit flows and include web app/web API.
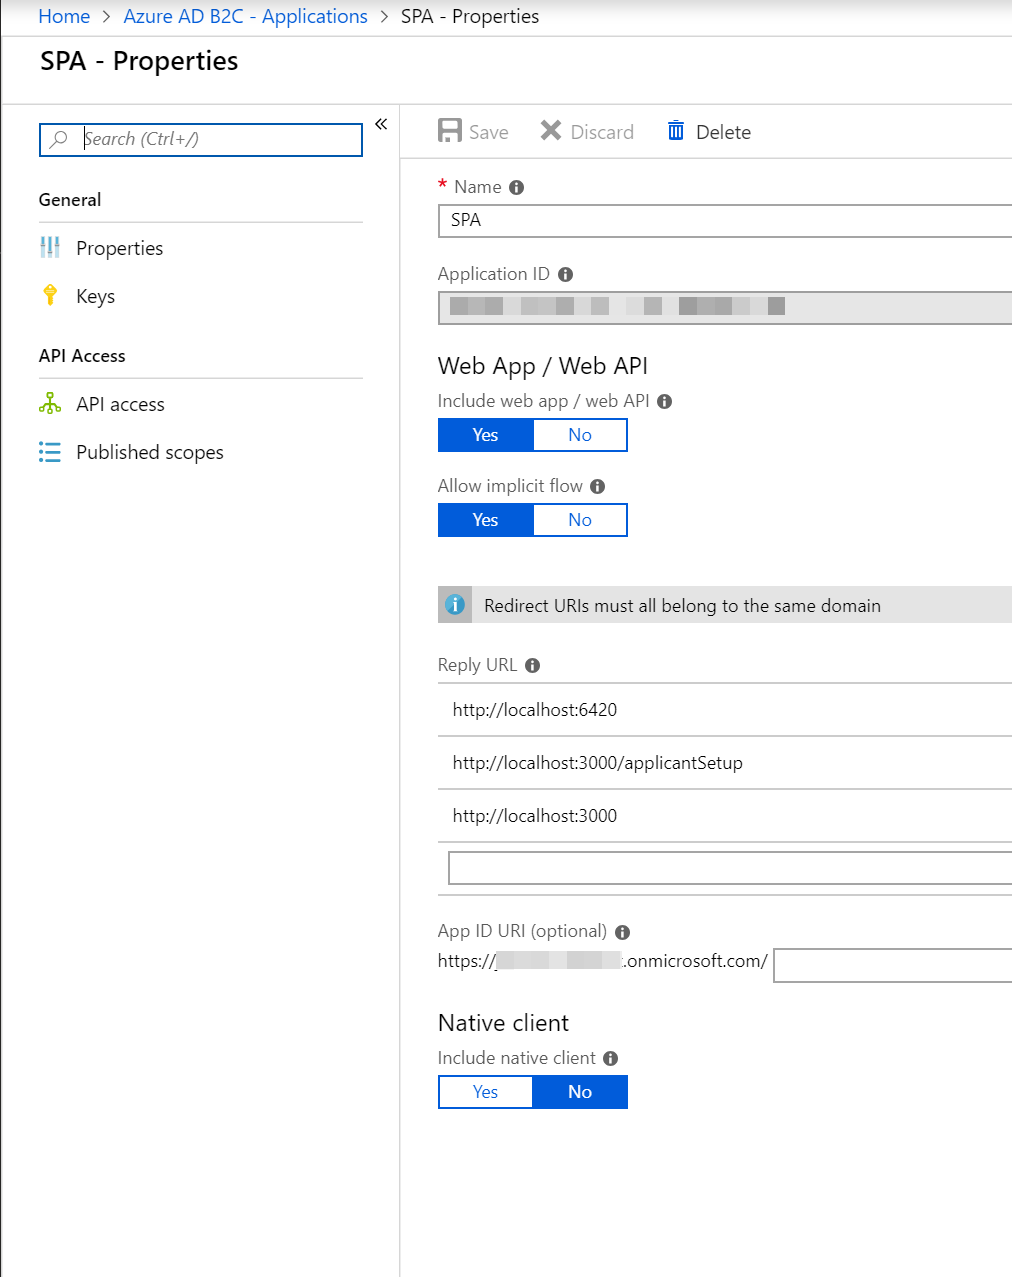
The reply URLs should contain a list of all the page from which a user can authenticate. Unfortunately, wildcards are not permitted here so you need to be explicit.
With that created we can now move onto the API app. This one is similar except that you’ll want to put in place an App ID. Mine is simply called API
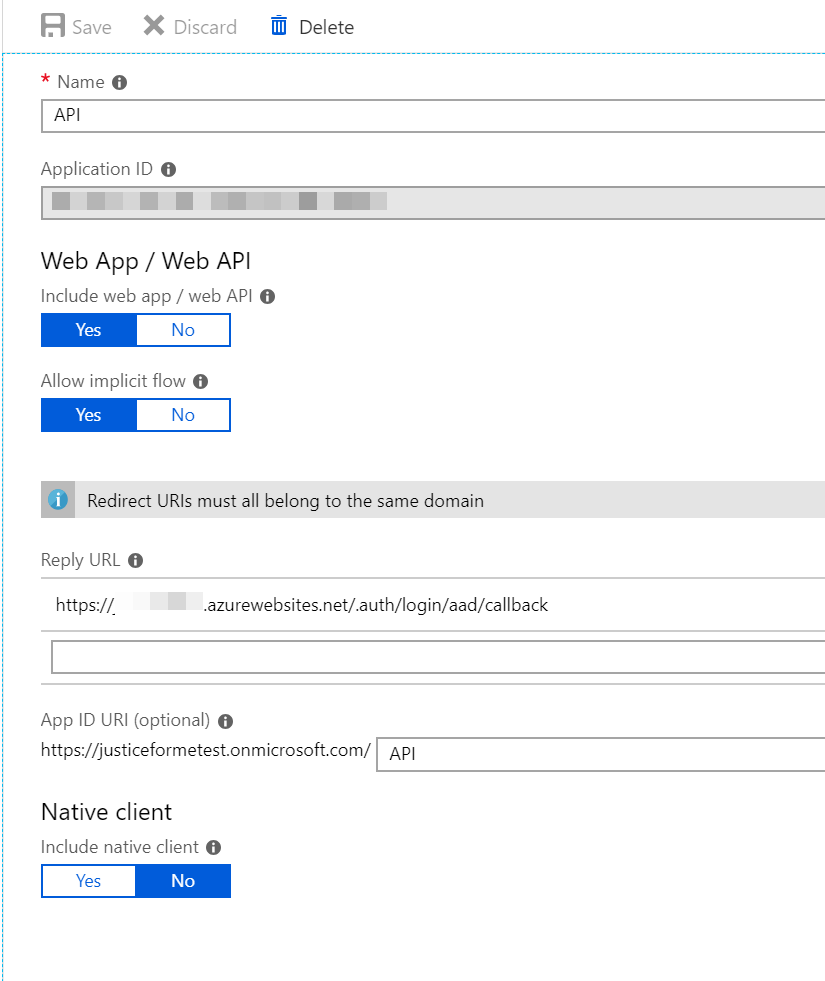
In that screenshot you’ll notice a reply URL. You likely don’t have that yet so leave it blank. We’ll come back to it. Now the API app will need to publish a scope. This is what ties your two apps (API and SPA) together. I created a single scope called access because I don’t have anything too complex in my API. You can publish multiple scopes if you wish.

Publishing scopes is half the equation, now back to the API application and select API access. In there select Add and select API in the first dropdown and then select both scopes in the second. Users who have authenticated against the SPA will now be able to access the API.
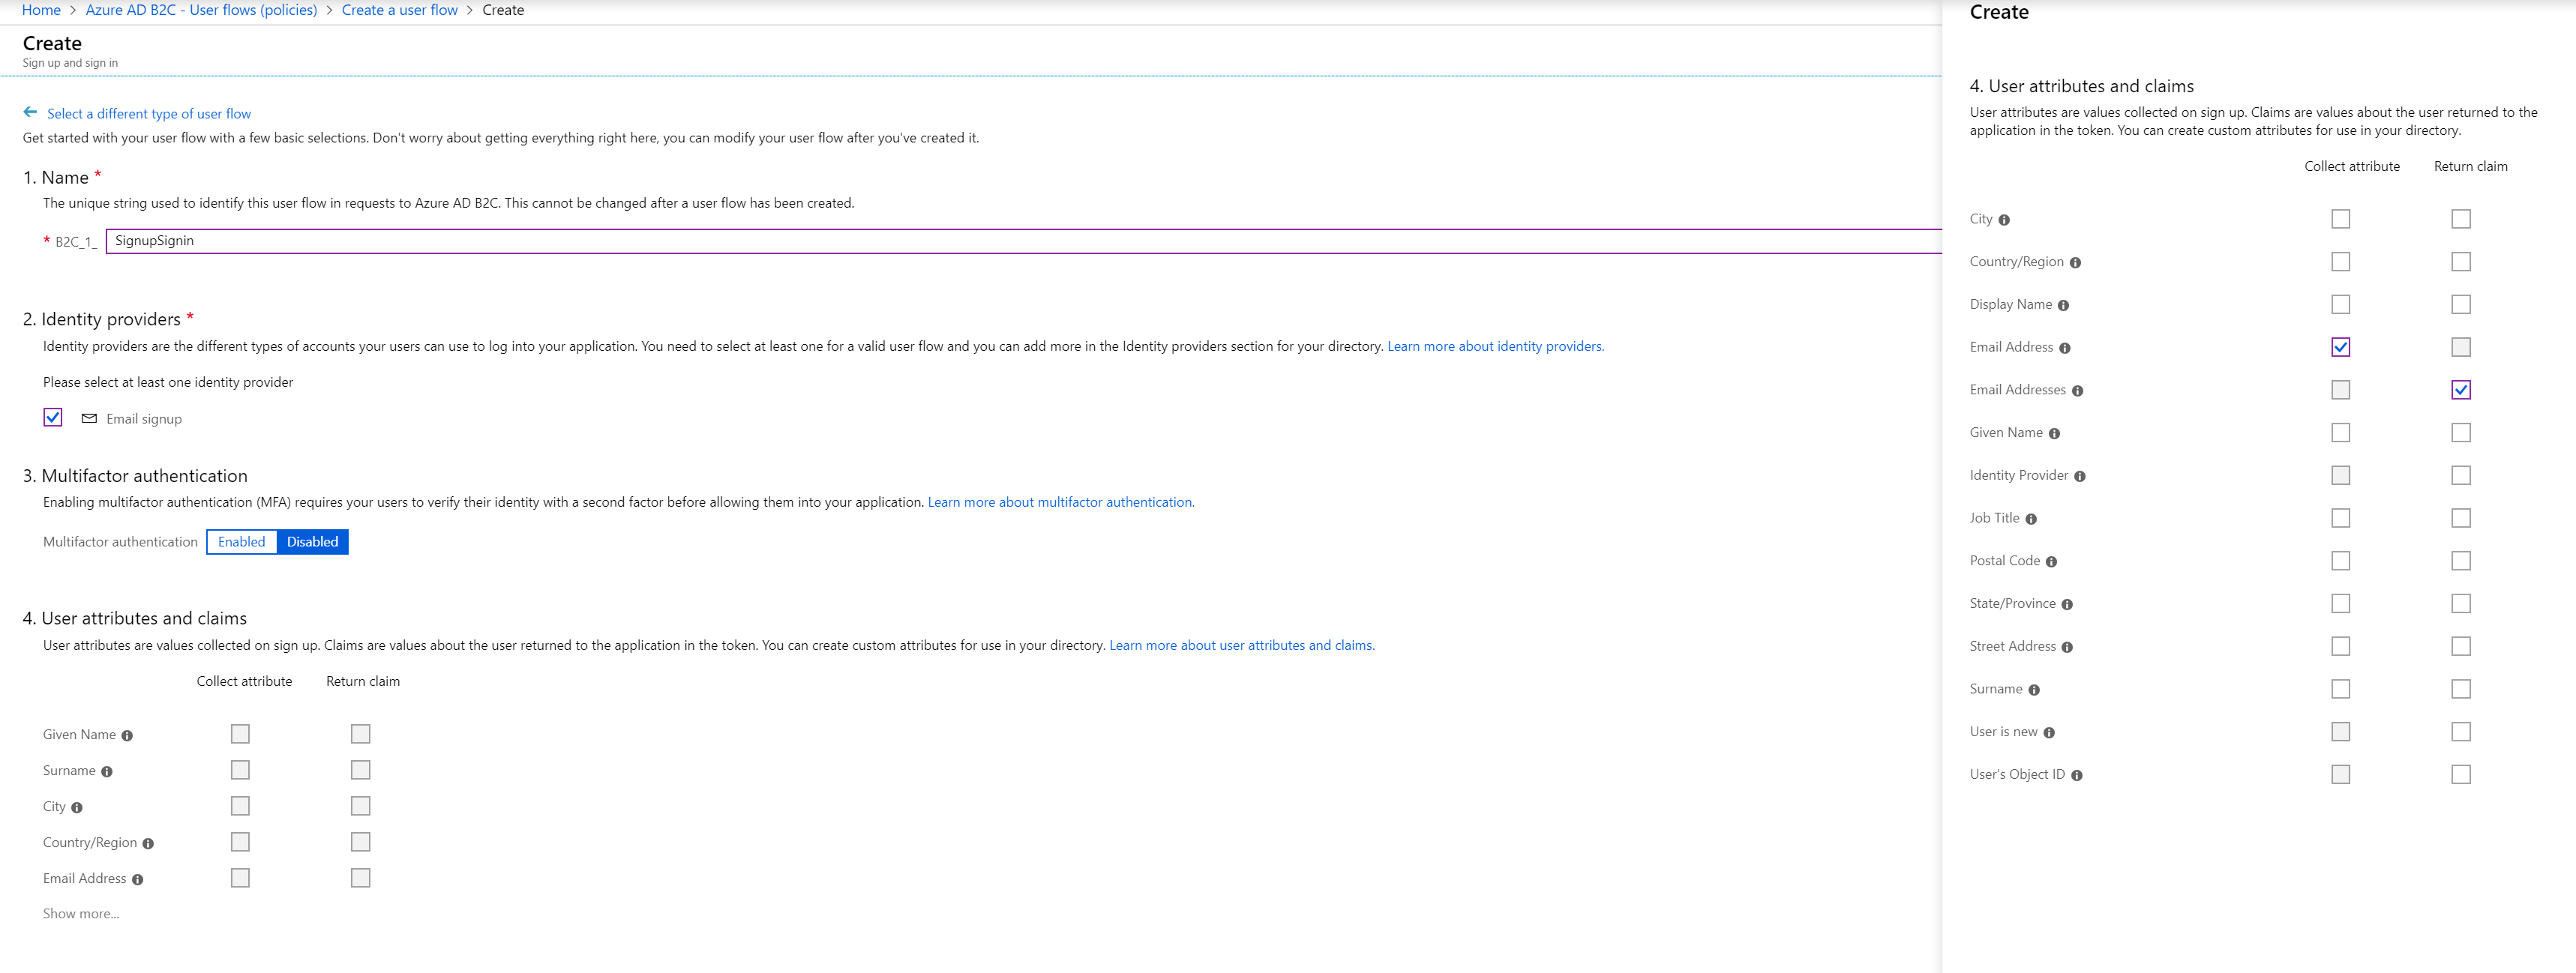
We’re almost done in the B2C for now but we also want to set up a User Flow. This is a hosted login experience. You can customize the experience but that’s outside of this tutorial. We want a basic Signup and Sign in policy. I named mine SignupSignin but you can pick whatever you like. Be sure to check the Email Signup identity provider. I also drilled into the User attributes and claims to select Email Address as a collected attribute and Email Addresses as a returned claim. This means that during the signup process we’ll ask for the Email address and when authenticating in the SPA the JWT passed back will contain a collection of Email addresses. You can select more if you like.
Once the policy is created you’ll want to select it and click Run user flow in there you’ll find a metadata URL which will be used in your SPA application and functions. Make a note of it. While we’re here also make a not of the ID of the API application.
Now all this is created we’re now ready to jump over to the function app you want to authenticate. Phew, that took a while.
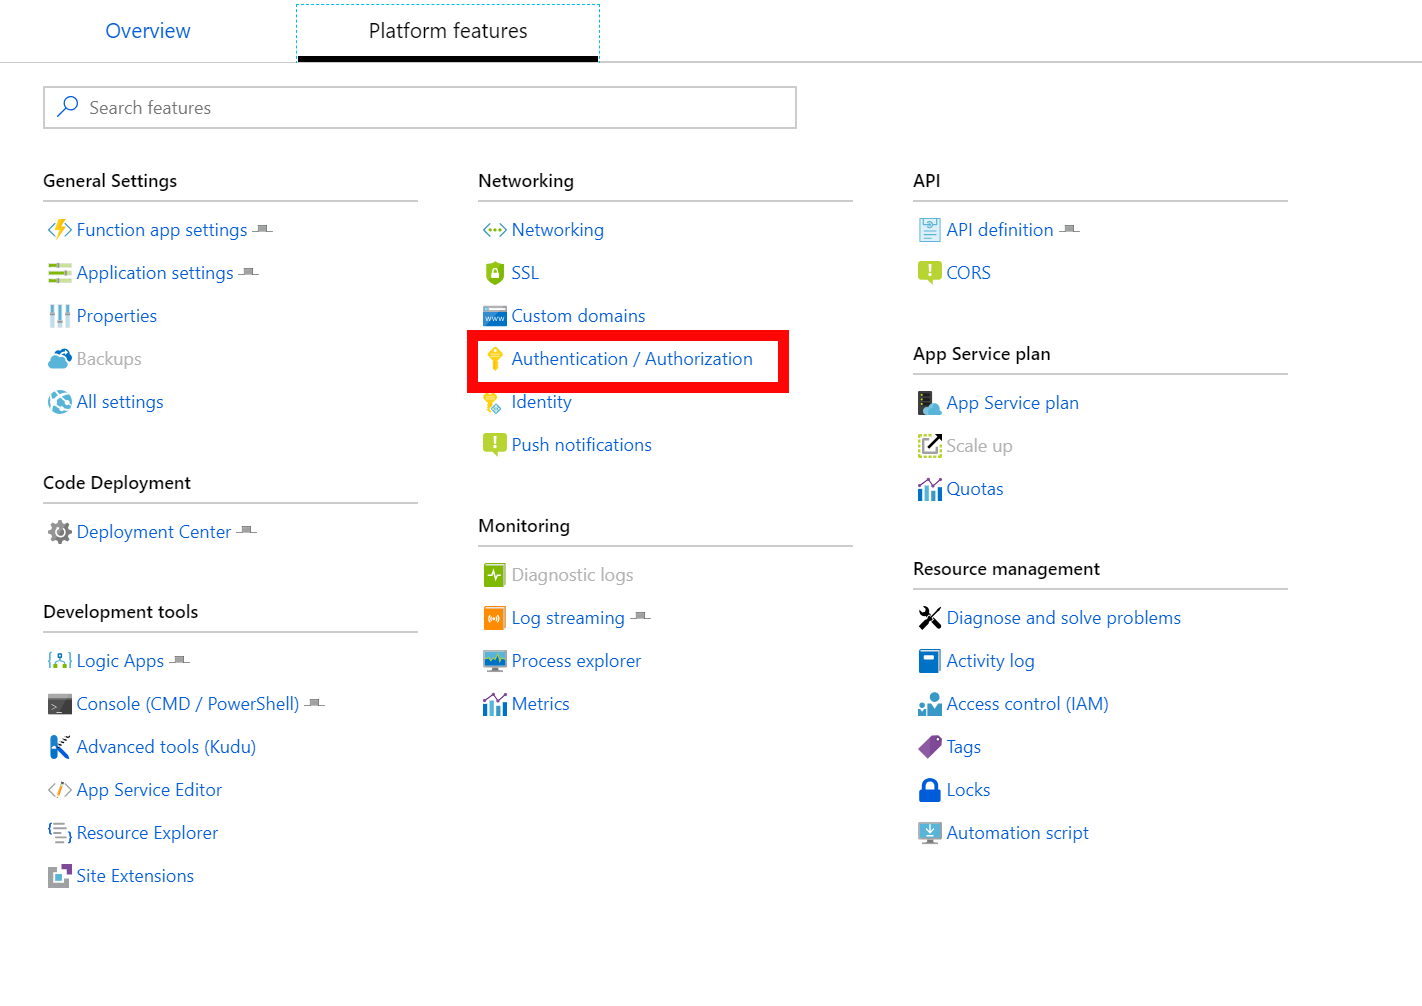
Switch back to your primary directory and head over to your function app. If you don’t have one created already just create a blank C# one. In the function app click through to the platform features and select Authentication.
In authentication turn on App Service Authentication and select Azure Active Directory. Switch over to advanced and enter the API application Id in the Client ID field and the metadata URL in the Issuer Url field. These are the two things you made notes about before leaving the B2C.
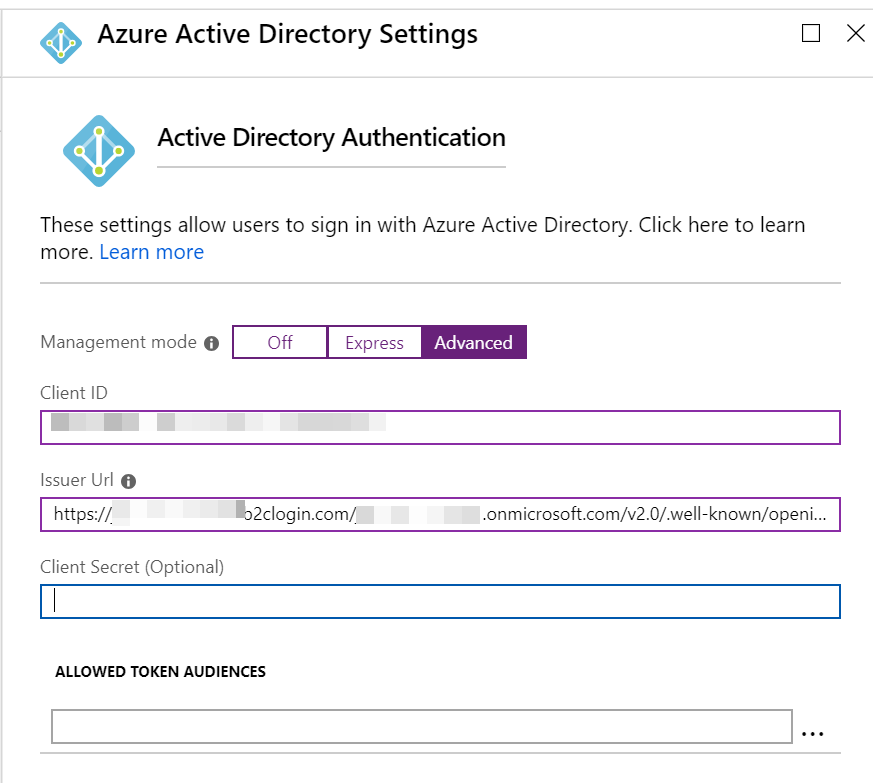
Finally change the Action to take when request is not authenticated over to Log in with Azure Active Directory. Save the authentication page. Now you’ll need to make one final change over in the B2C. You’ll need to find the URL for you function app. This is easily found by clicking on a function and running it. Take the URL and back in the B2C head to the API application.
In the API application you’ll need to set the Reply URL. The URL should be of the format https://<functionapp name>/.auth/login/aad/callback so if you function app is called bob the result would be https://bob/.auth/login/aad/callback. With that in place we’re done the Azure setup.
In React
Open up a terminal and install the handy package react-aad-msal. (Note: If you run into problems authenticating you might want to try the react-aad-msal-jfm package instead. It works around a new domain that Microsoft is using for B2C which isn’t accepted by the react-aad-msal package.). This package provides some React components you can put on your page to do the actual authentication.
In a page I put in this control. I’m using Create ReactApp so the values for authority, clientID and scope are taken from a config file. The Authority is the Url for the policy so something like https://yourtenant.b2clogin.com/tfp/yourtenant.onmicrosoft.com/B2C_1_SiUpIn. The client Id is the ID of the SPA app from the B2C. Finally the scope is the fully qualified scope https://yourtenant.onmicrosoft.com/API/access
import { AzureAD, LoginType, MsalAuthProviderFactory } from 'react-aad-msal-jfm';
...
 <AzureAD
    provider={new MsalAuthProviderFactory({
        authority: process.env.REACT_APP_AUTHORITY,
        clientID: process.env.REACT_APP_CLIENT_ID,
        scopes: [process.env.REACT_APP_SCOPE],
        type: LoginType.Popup,
        persistLoginPastSession: true,
        validateAuthority: false

    })}
    unauthenticatedFunction={this.unauthenticatedFunction}
    authenticatedFunction={this.authenticatedFunction}
    userInfoCallback={this.userJustLoggedIn} />
With this in place a login button is rendered. Click on the button and a popup will be shown with your login page. I saved off the bearer token from the userInfoCallback which is passed an object containing the jwtAccessToken. The emails we permitted as a claim are passed back as idToken.emails. My reducer looks a bit like
case getType(login.loginSuccess):
    return {
        ...state,
        loggedIn: true,y
        bearerToken: action.payload.body.jwtAccessToken,
        displayName: action.payload.body.user.name,
        userId: action.payload.body.user.userIdentifier,
        email: action.payload.body.user.idToken.emails[0]
    };
This jwtAccess token should be used in the headers of any fetches against the function app.
let result = await fetch(`${process.env.REACT_APP_API_URL}/Practices`, {
            method: 'GET',
            headers: {
                'Authorization': `Bearer ${this.props.login.bearerToken}`
            }
        });